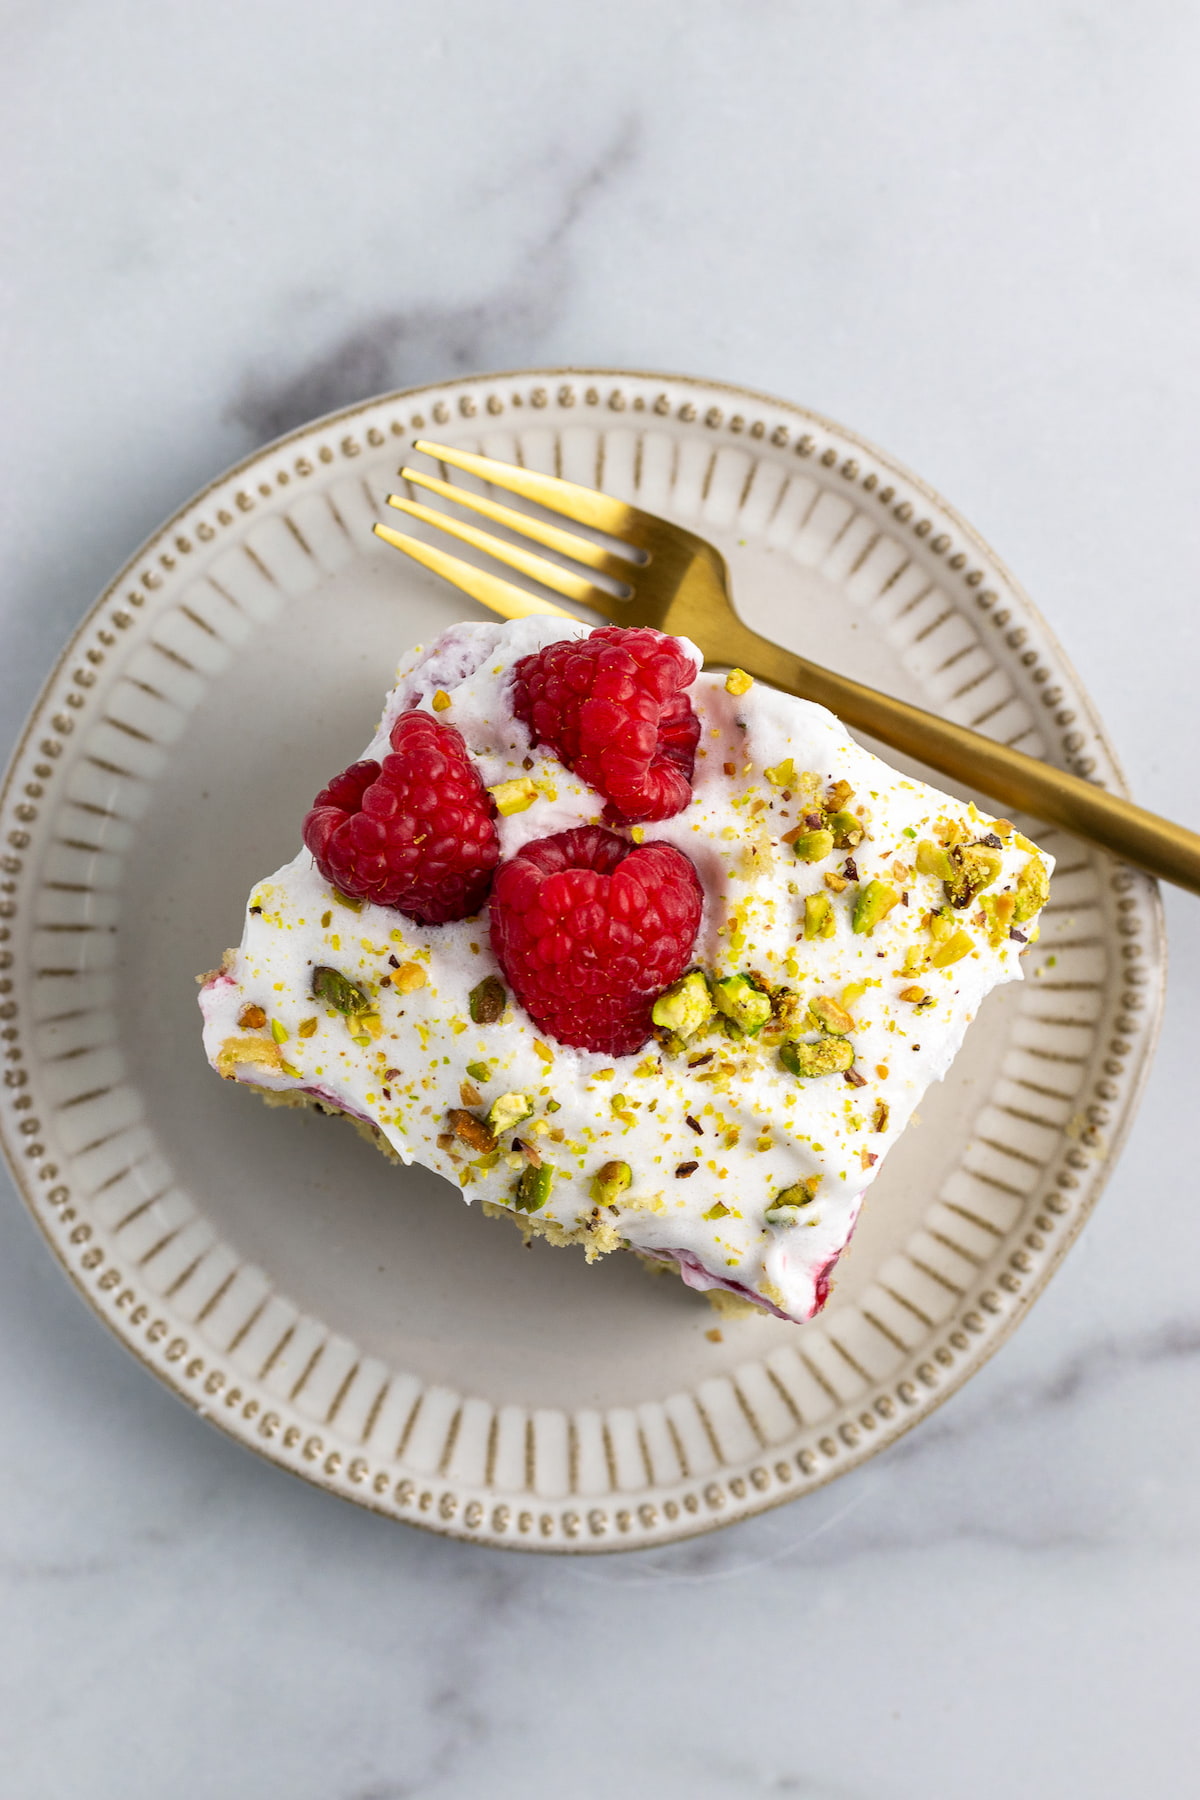
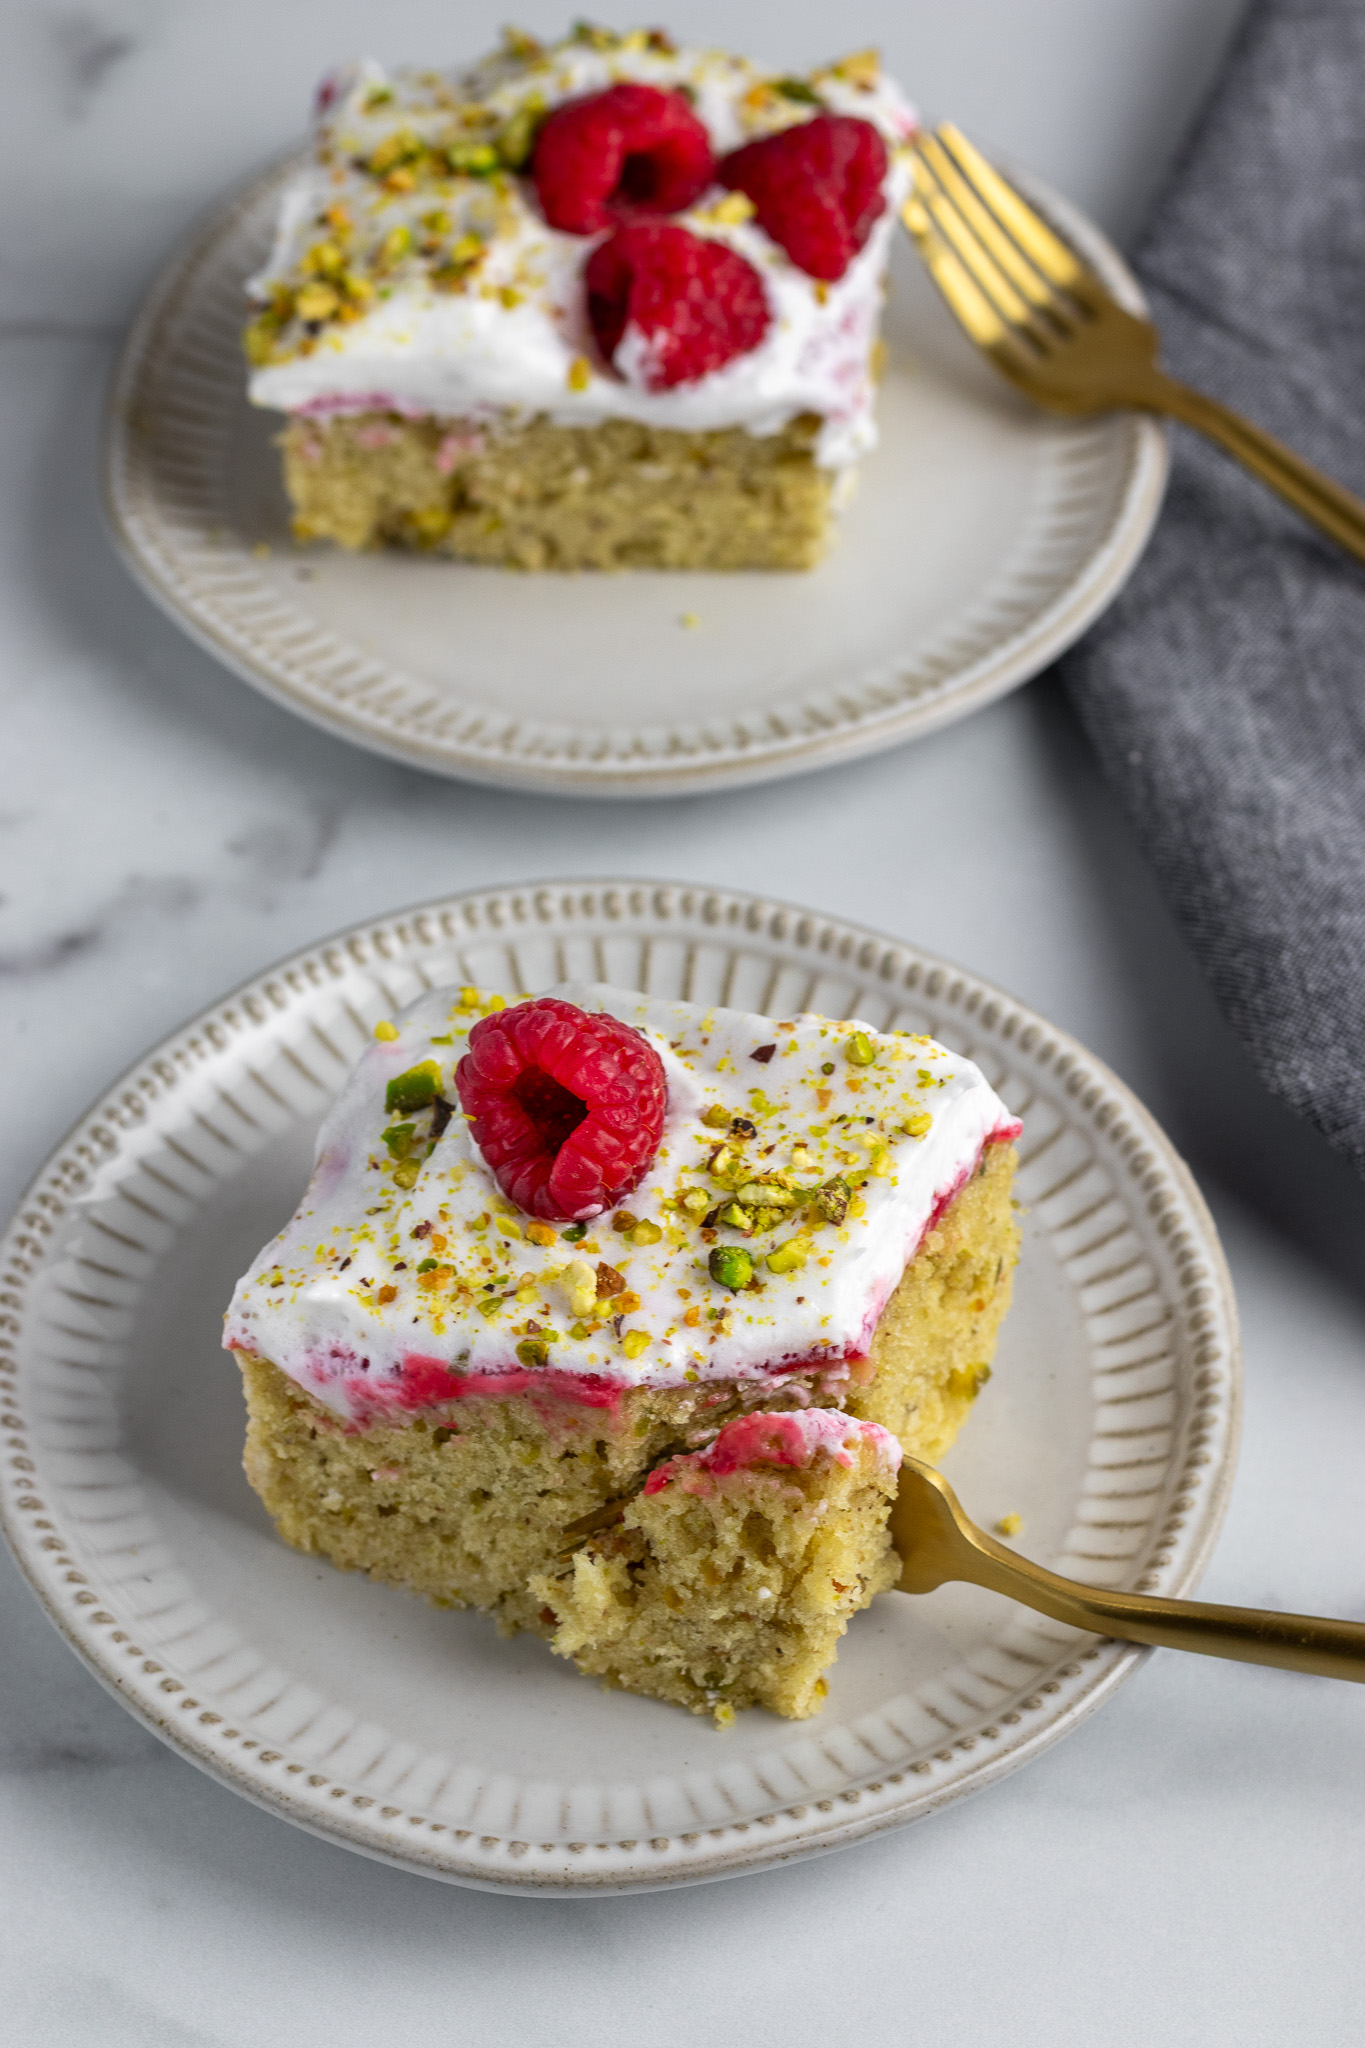
Pistachios and raspberries pair so well together, and this Easy Dairy-Free Pistachio Raspberry Cake is no exception. Deliciously light with a fresh raspberry sauce and whipped topping, it’s a refreshing, scratch-made sheet cake without pudding mix, preservatives or food dyes.
And if you’re like me and care more about the taste than fancy decorating (growing up, my kids always said my cakes tasted delicious but were ugly – LOL!), you’ll love this recipe!
Why You Will Love This Pistachio Raspberry Cake
- Raspberries and pistachios! A flavor combo match made in heaven (IMO)!
- Dairy-free! The entire recipe is dairy-free, with NO compromise on taste. Anyone will love it.
- No artificial flavors or food dyes!
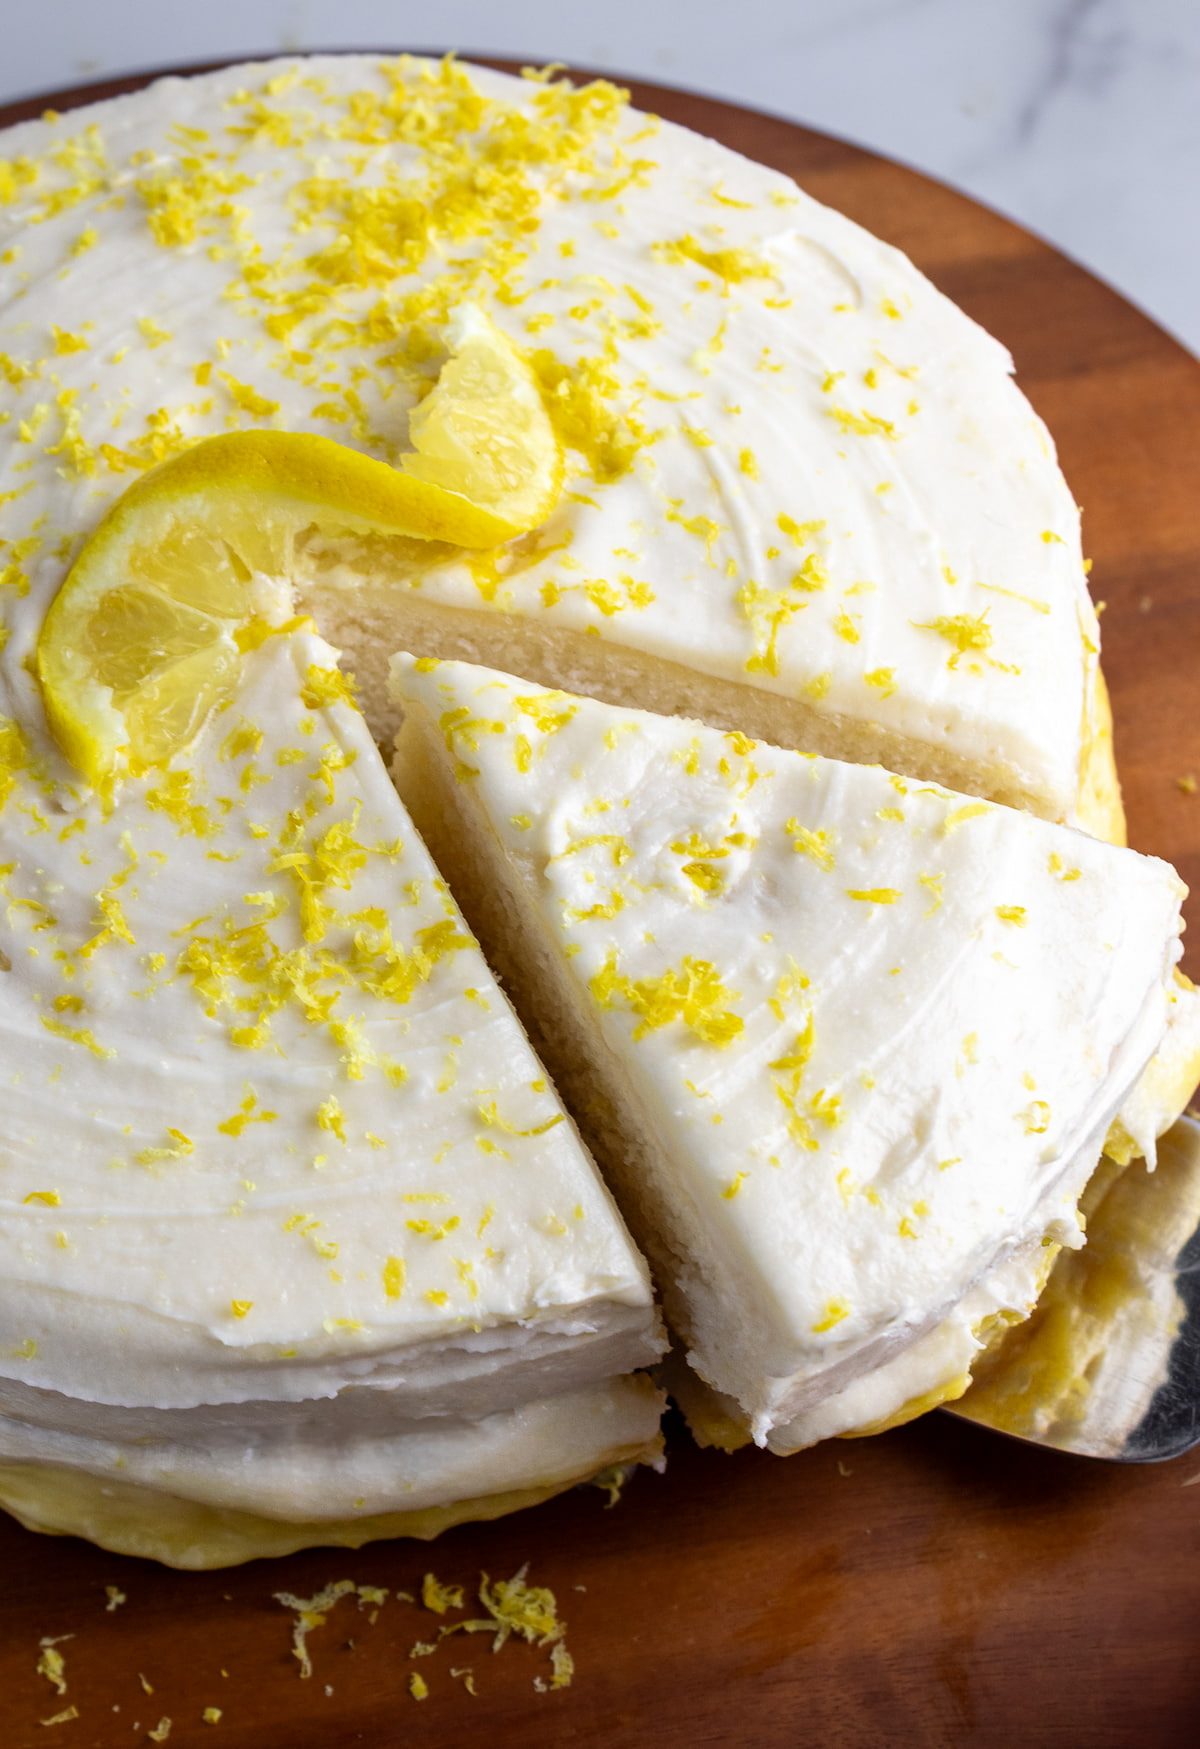
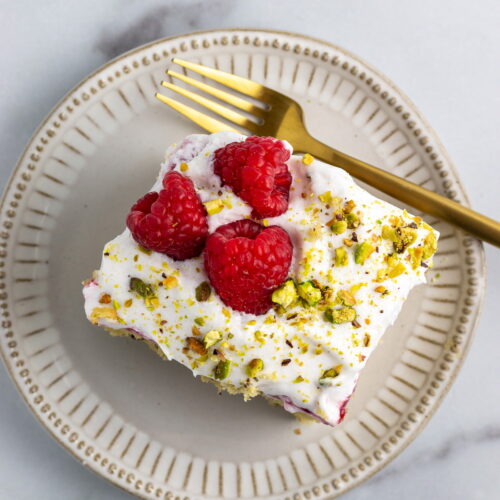
- It’s an easy sheet cake – perfect to take to a party and doesn’t require “decorating”! I love beautiful two-layer cakes topped with frosting and decorated beautifully (like my dairy-free lemon cake), but my decorating skills are “meh,” and sometimes you just need a delicious cake without the extra time and fuss of a layer cake. With that said, individual pieces ARE pretty on a plate (at least I think so). 🙂
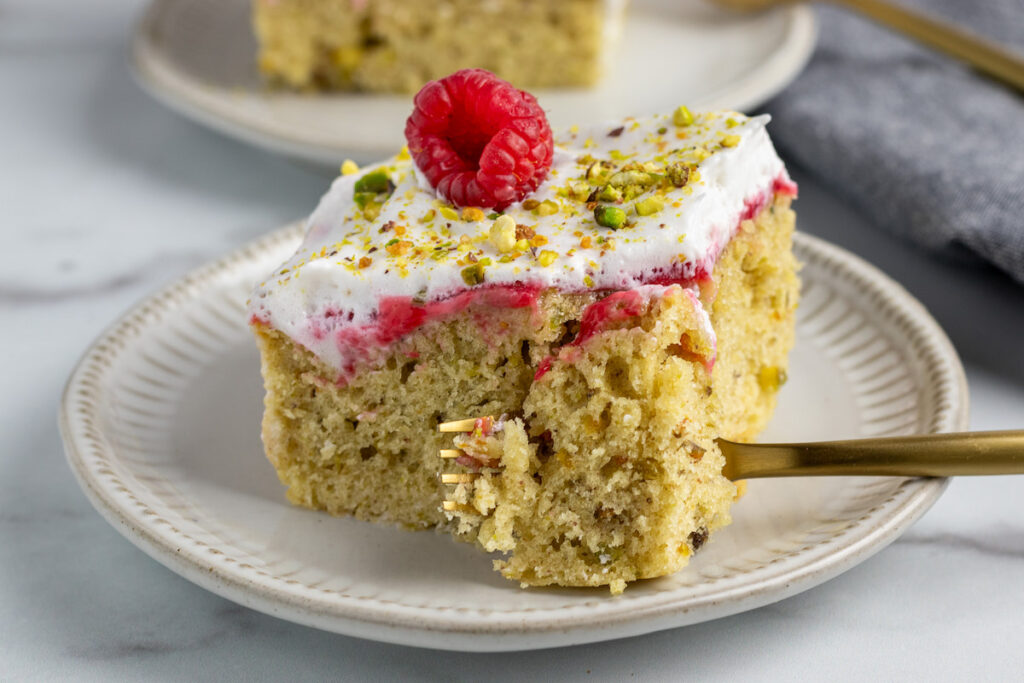
- SO delicious! It’s a light, fluffy, moist pistachio cake with a thin layer of sweet, tart raspberry sauce topped with a “whipped cream” of your choice!
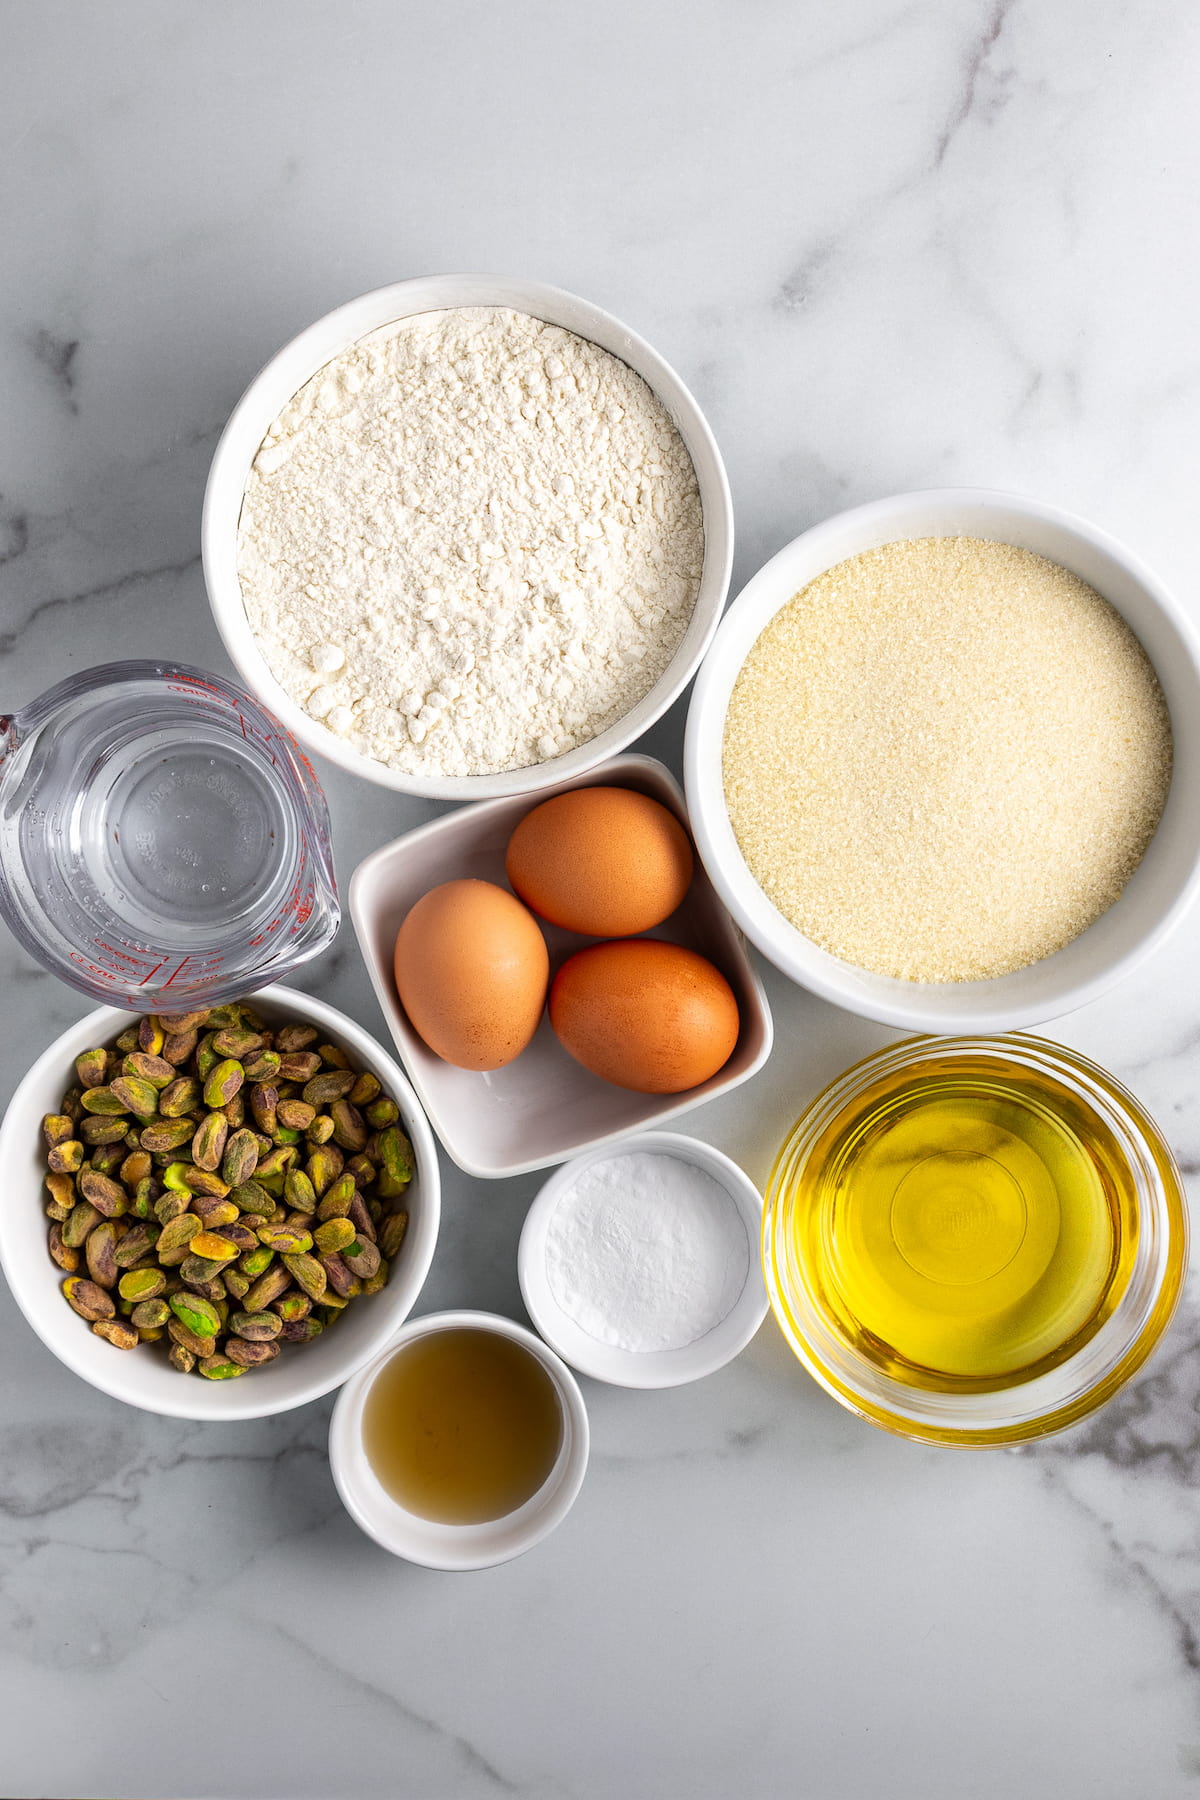
Ingredients You’ll Need for This Pistachio and Raspberry Sheet Cake
Pistachio Cake Ingredients
- Oil. A neutral oil, like avocado oil (what I use for this cake) or canola oil
- Pistachios. This recipe uses shelled pistachios, and because the roasted and salted kind are easier to find in most stores, it was created using those. If you want to use unsalted pistachios instead (raw or roasted), they will work great; you’ll just to need to add some salt (see recipe card below).
- Club soda. Don’t knock it ’til you try it! 🙂
- 3 Eggs
- Sugar, all-purpose flour, baking powder
- Almond extract
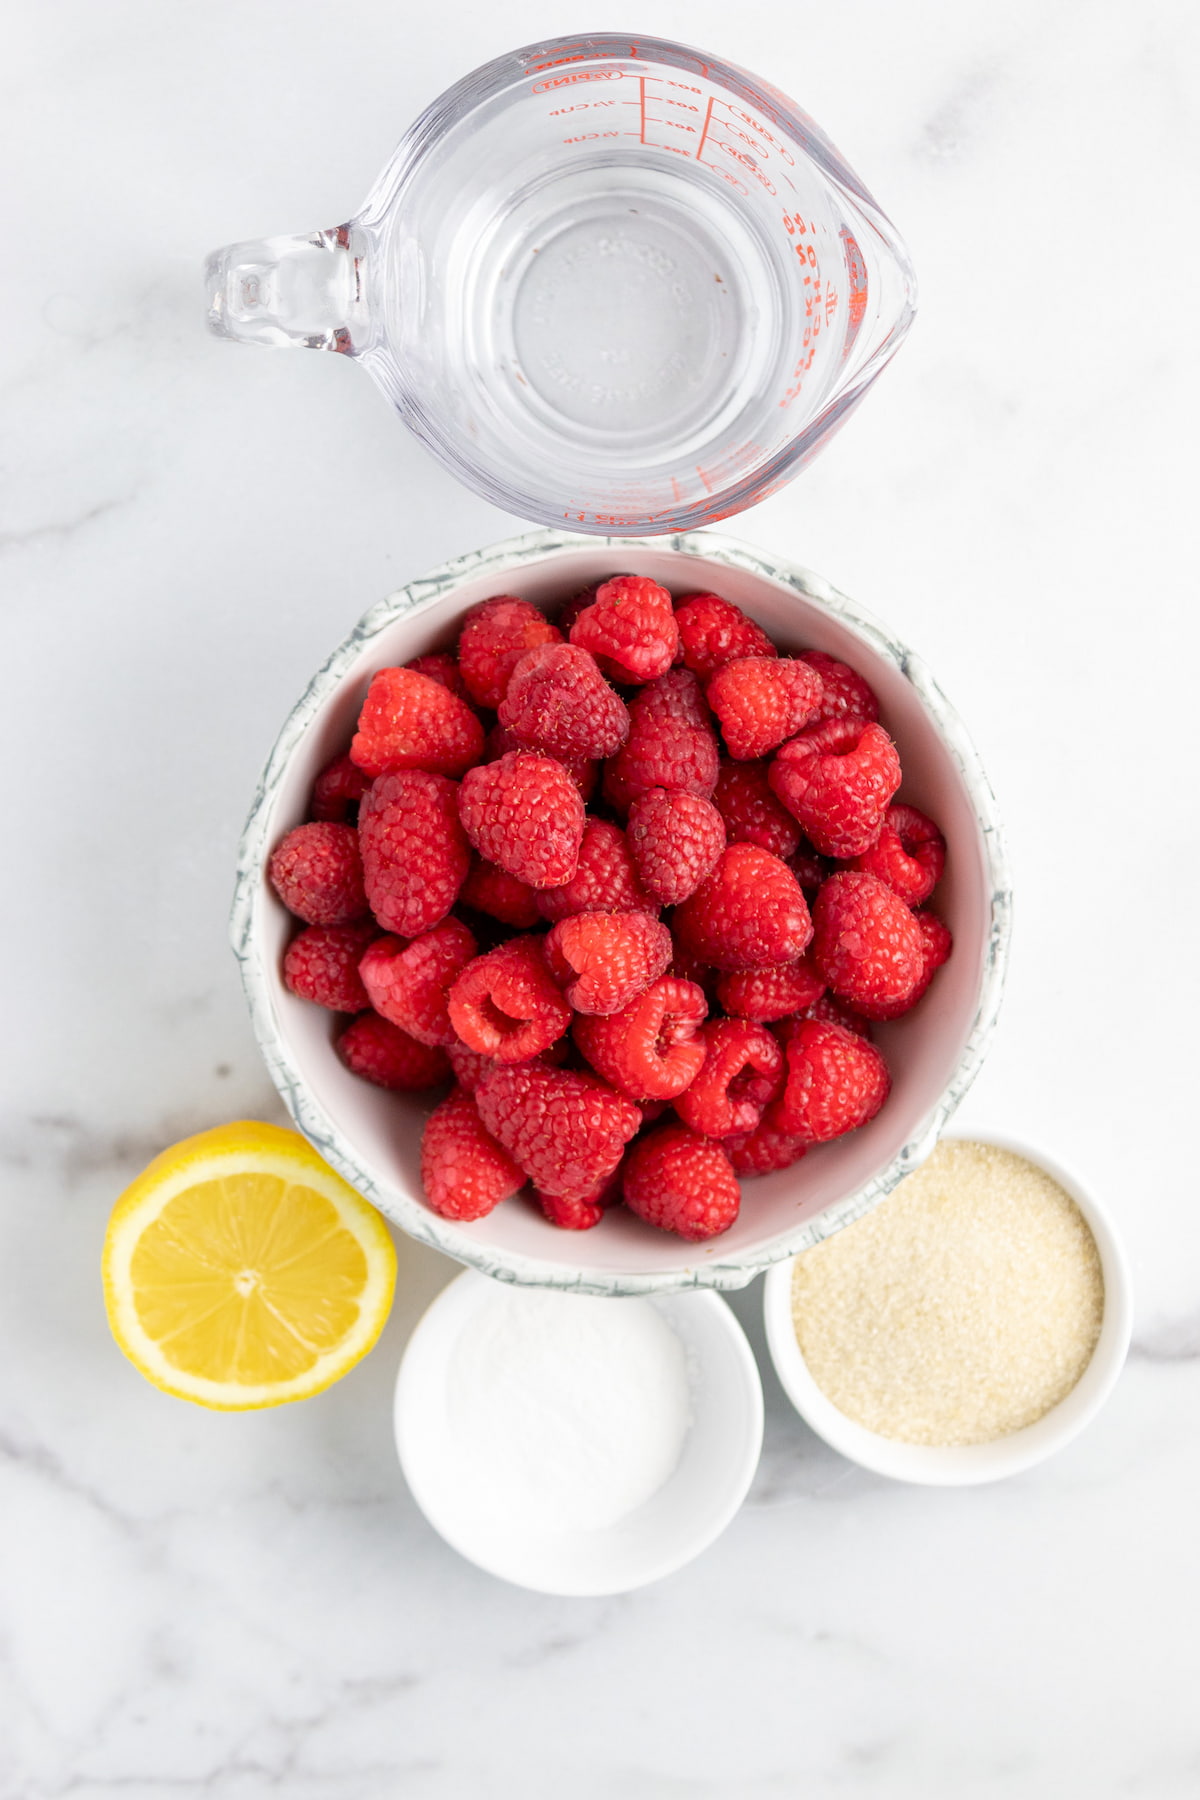
Seedless Raspberry Sauce Ingredients
- Raspberries. Fresh or frozen (thaw and drain first if using frozen).
- Sugar
- Water
- Lemon juice
- Cornstarch (or arrowroot powder)
Whipped Topping
Since this is an easy recipe, I use store-bought TruWhip Vegan whipped topping. I don’t like the So Delicious CocoWhip with it because the strong coconut taste competes with the other flavors, although I have made it with both in the past and found that the coconut taste dissipates after the whole cake sites together for a day in the refrigerator.
Alternately, you can make your own whipped topping, of course.
How to Make This Easy Pistachio Sheet Cake
Make the Pistachio Cake
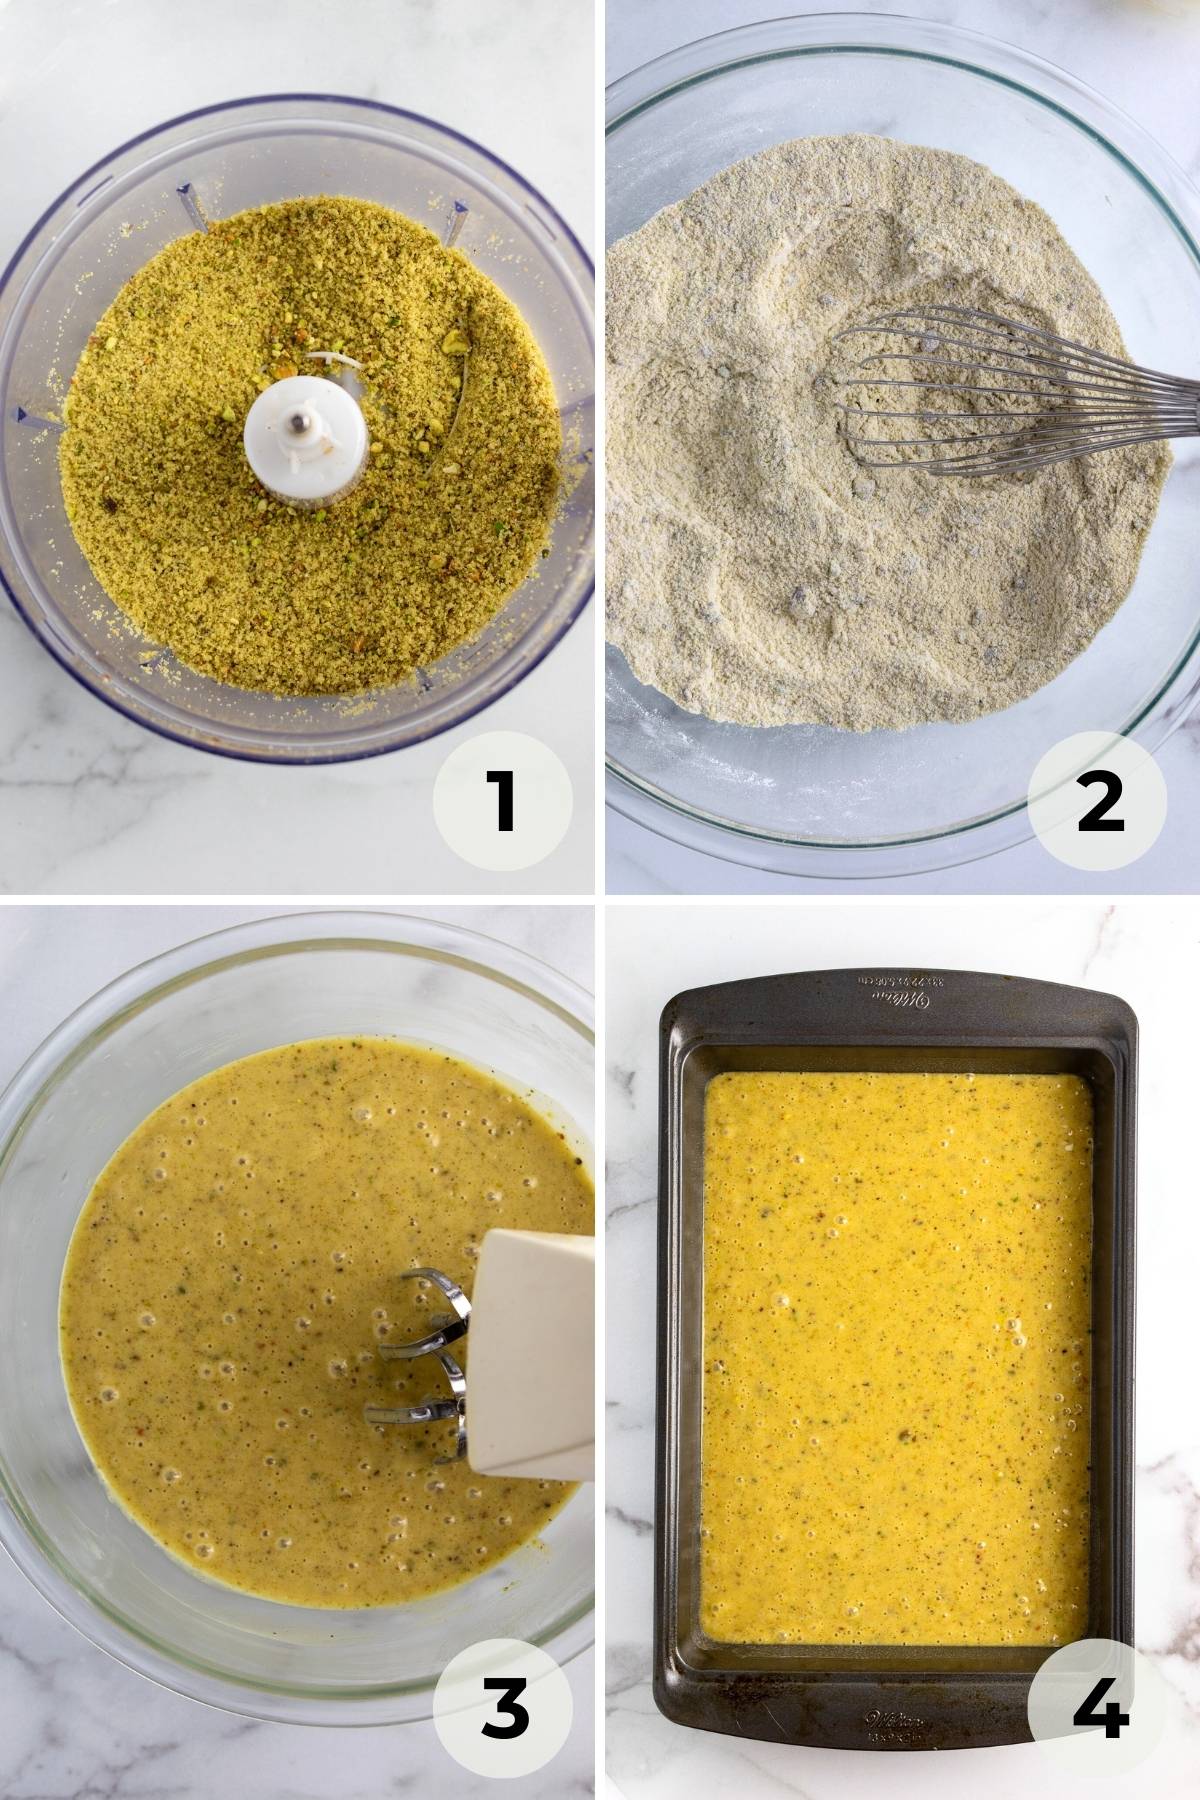
STEP 1: Crush your pistachios in a food processor with your sugar. If you don’t have a food processor, you can put your pistachios in a plastic baggy and smash them, then mix with sugar in a bowl.
STEP 2: Mix your dry ingredients in a large bowl.
STEP 3: Add your wet ingredients (adding the club soda last) and blend with an electric mixer on medium for 2 minutes (or combine by hand, whisking well for 2 minutes).
STEP 4: Pour the cake batter into a 9×13 cake pan you have coated with nonstick baking spray. Bake at 325 degrees F. for 25-28 minutes (26 is just right for my oven).
Make the Raspberry Jam Sauce; Then Add the Sauce and Whipped Topping
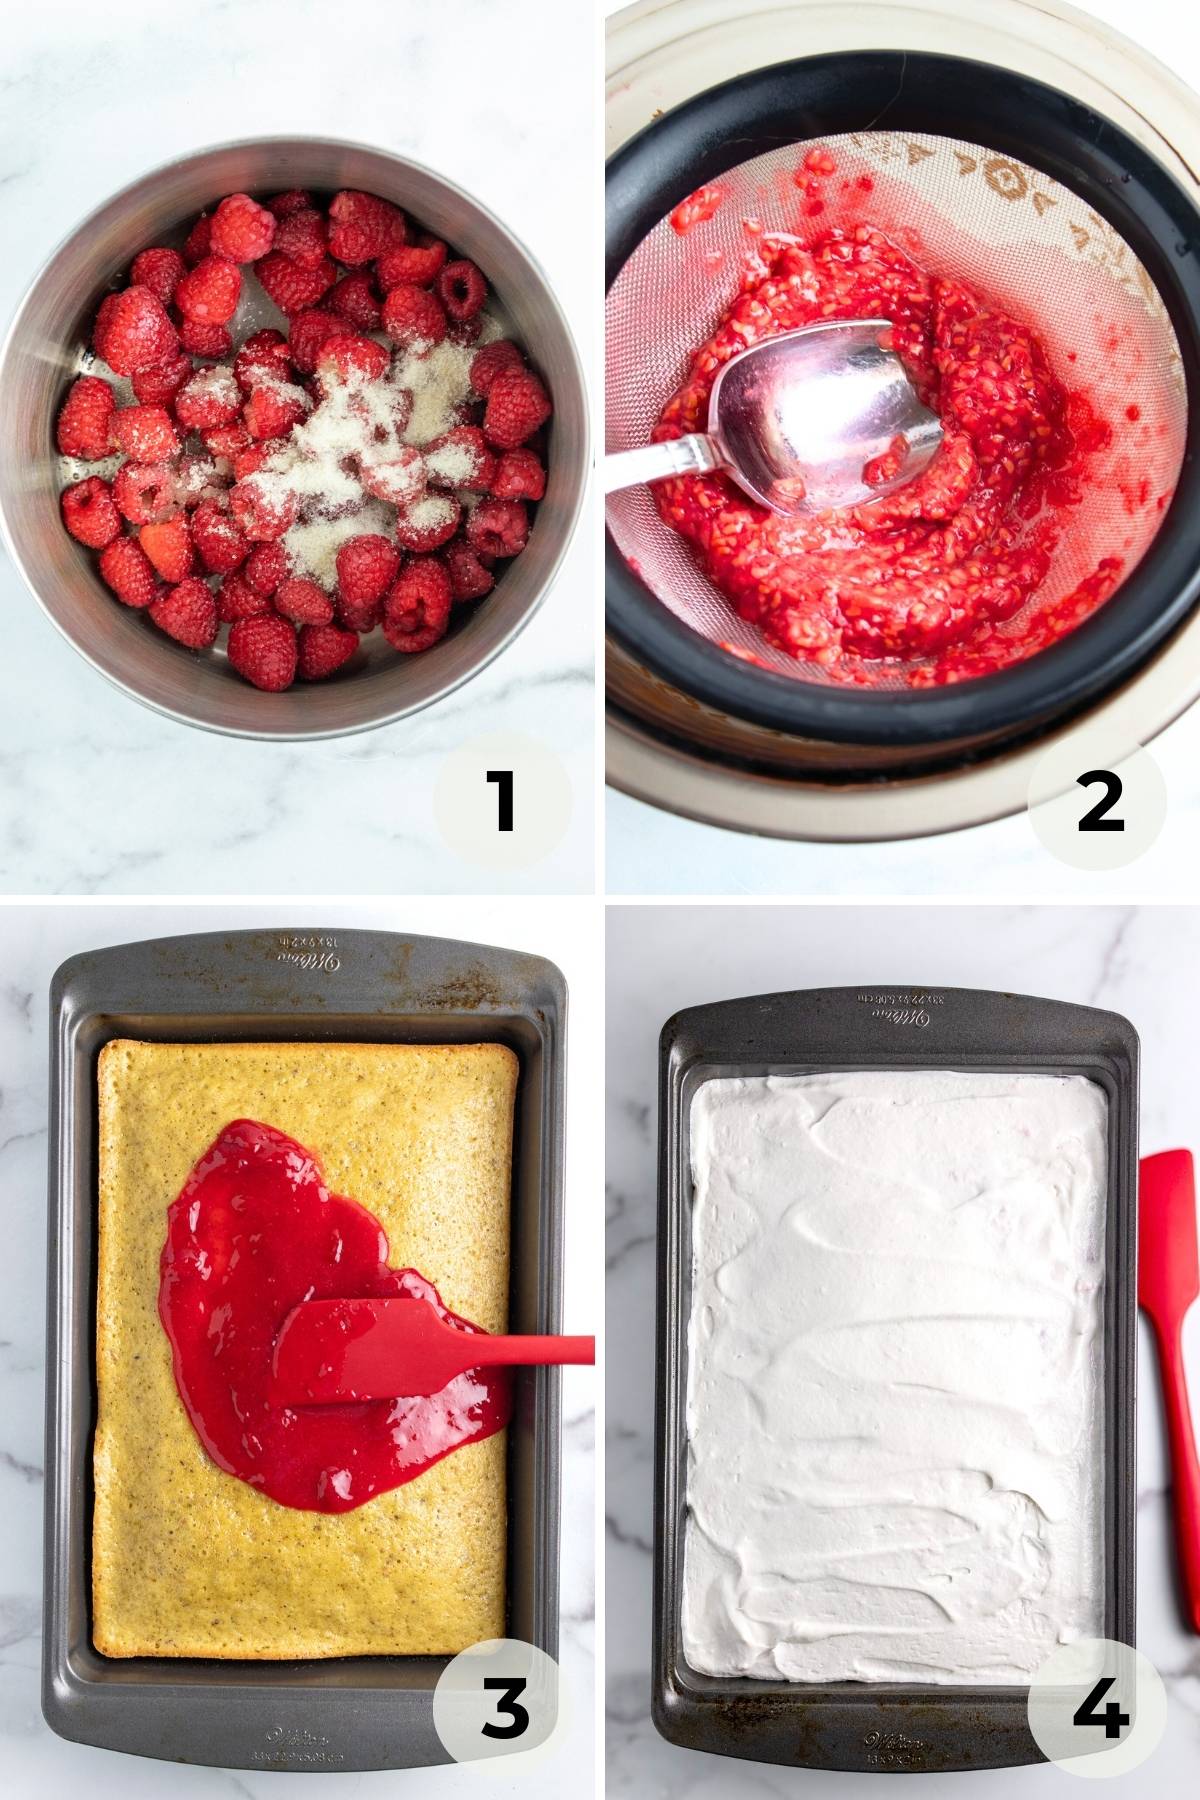
STEP 1: Make the raspberry sauce in a medium-sized pot on the stove, combining everything except for the cornstarch/water slurry.
STEP 2: Using a fine mesh strainer, remove the seeds from the sauce by pushing the sauce through using the back of a large spoon. Do about half at a time. Return the strained sauce to your pan, make a cornstarch/water slurry and then add that to your pan. Whisk as you bring it back to a boil, then lower to simmer, whisking until it’s thick enough that it sticks to the back of a spoon. If it isn’t thick enough, you can turn up the heat and continue to whisk until more of the liquid evaporates. If it is too thick, you can add a bit more water.
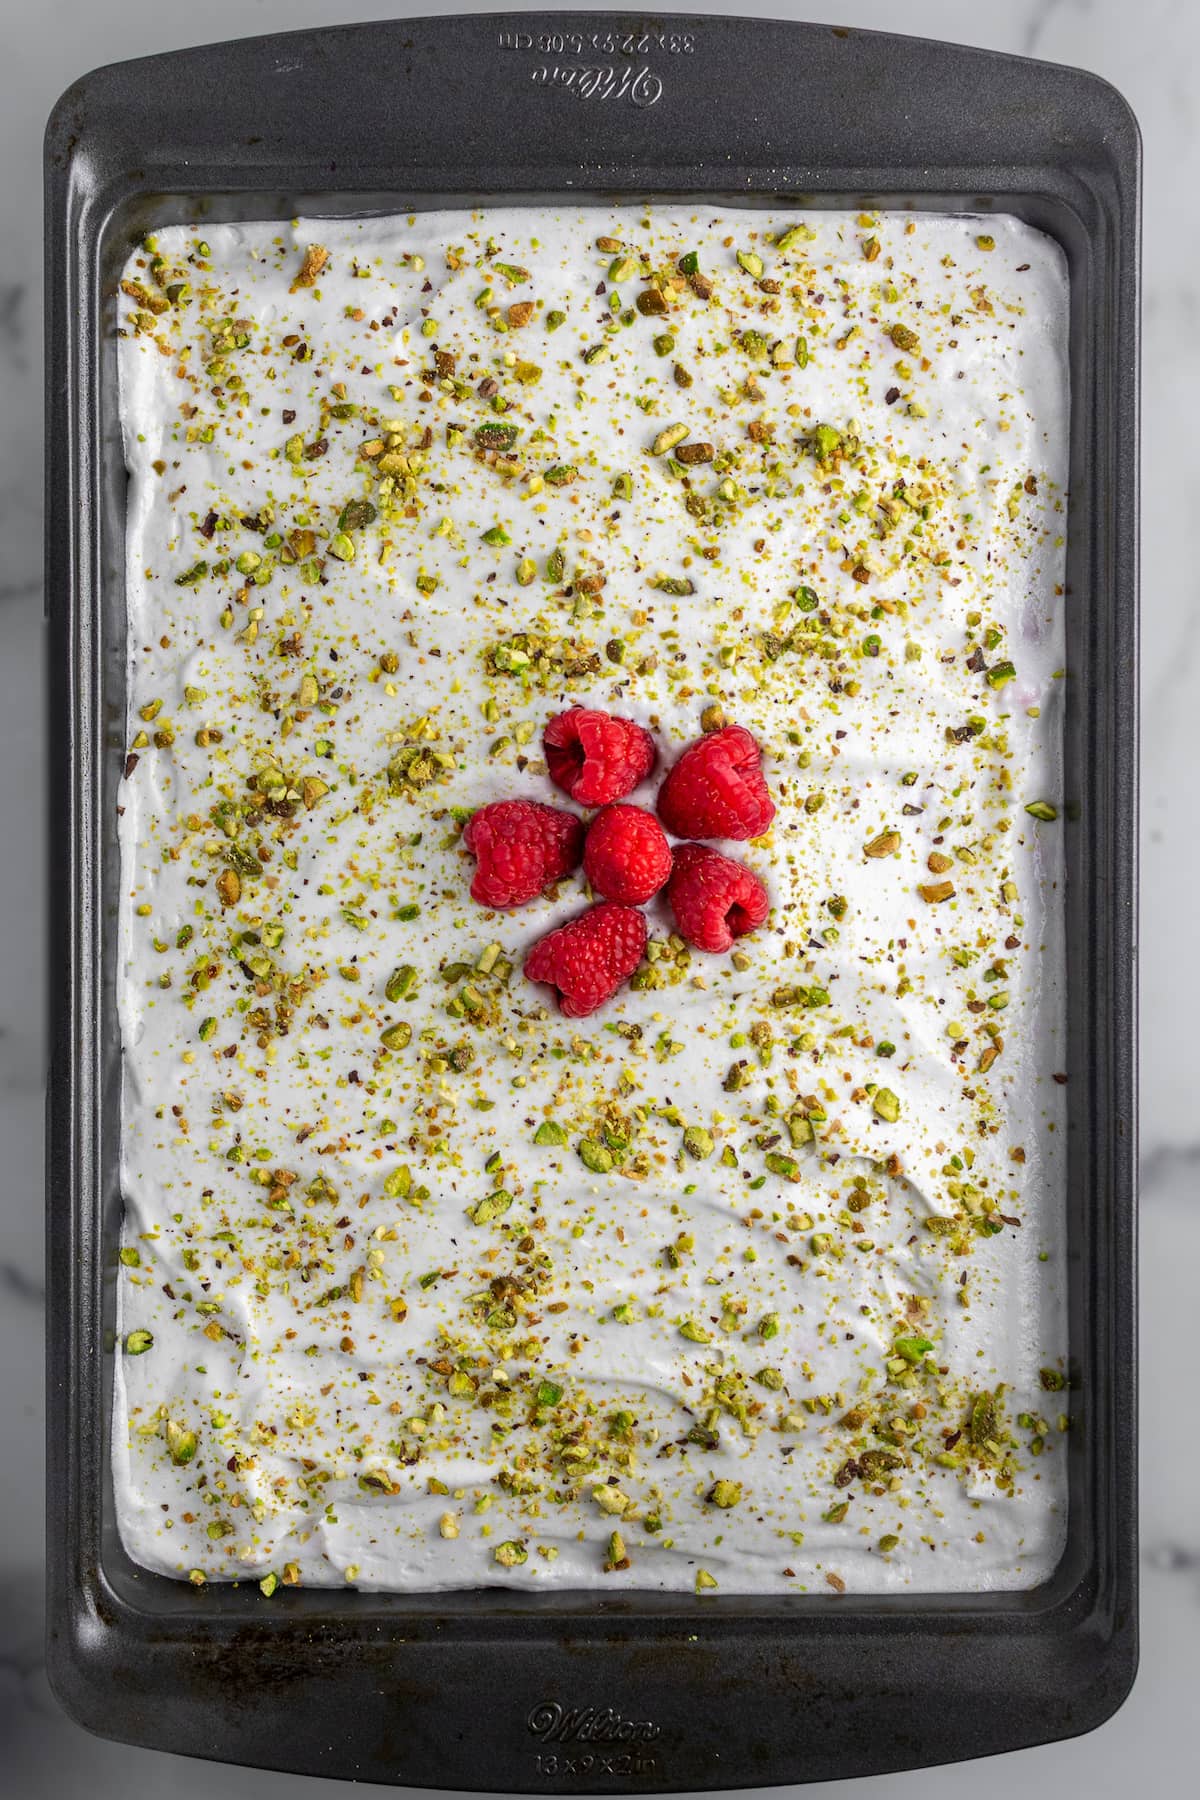
STEP 3: Spread your homemade raspberry jam sauce on your cooled cake, making a thin, even layer.
STEP 4: Add your whipped topping of choice.
FINAL STEP: You can then decorate with fresh raspberries and/or roughly chopped pistachios. You can serve the cake immediately or, for maximum taste, put the cake in the fridge for an hour or more before serving. This cake is delicious served cold (my fav) or at room temperature.
Looking for more recipes made with pistachios?
You may also enjoy one (or all) of these dairy-free recipes made with pistachios:
- Dairy-Free Pistachio Nut Muffins
- Vegan (no eggs, no dairy) Pistachio Matcha Muffins
- For dinner – One Pan Pistachio Salmon
Try these other scratch-made dairy-free cake recipes:
- Dairy-Free Lemon Cake
- Chocolate Amaretto Skillet Cake (dairy-free, egg-free)
- Dairy-Free Caramel Apple Cake
- Strawberry Lemon Poppy Seed Shortcakes
Pistachio Raspberry Sheet Cake (Dairy-Free)
Equipment
- 1 handheld mixer
- 1 Large Mixing Bowl
- 1 Whisk
- 1 pot (for making the raspberry sauce)
- 1 mesh strainer (for straining the sauce to remove the seeds)
- 1 stand mixer (or handheld) (if making your own whipped topping)
Ingredients
Dairy-Free Pistachio Cake
- 3/4 cup salted, roasted shelled pistachios (if you use unsalted instead, add 1/2 tsp salt to recipe)
- 1 1/4 cups granulated sugar
- 2 1/4 cups all-pupose flour
- 2 1/2 tsp baking powder
- 3/4 cup neutral oil (such as avocado oil or canola oil)
- 1 1/2 tsp almond extract (if nut-free or don't have almond extract, you can sub with vanilla extract)
- 3 large eggs
- 1 cup club soda
Seedless Raspberry Sauce
- 12 oz raspberries
- 3 Tbsp granulated sugar
- 1/2 tsp fresh lemon juice (you can use bottled juice if you don't have a fresh lemon)
- 2 Tbsp water
- 1 Tbsp cornstarch
Dairy-Free Whipped Topping (if you want to make your own rather than use store bought)
- 3/4 cup cold, refrigerated canned coconut milk (the solid part only – typically, you can get enough from 1 can; sometimes it takes 2)
- 3 Tbsp powdered sugar
- 1 tsp vanilla extract
Instructions
Make and Bake the Cake
- Preheat oven to 350 degrees F. Spray two 8-inch round cake pans with nonstick baking spray and line the bottoms of each with parchment paper.
- Bowl 1 – In a large mixing bowl (note: everything will eventually be added to this bowl), combine the first 4 ingredients listed above – 3/4 cup of oil, 1 12/ cups of sugar, 1 Tbsp of lemon zest and 1 tsp of vanilla extract.
- Bowl 2 – In a medium-sized bowl, mix your 2 dry ingredients – 2 cups of cake flour and 1 Tbsp of baking powder.
- Bowl 3 – In your measuring cup or a small-medium bowl, mix the 1/3 cup of fresh lemon juice with the cold water.
- Bowl 4 – In a stand mixer bowl (or a medium-large bowl if using an electric hand mixer), beat the 6 egg whites and 1/2 tsp salt to stiff peaks. Stiff peaks = they should appear glossy, smooth and firm and stand on their own without sliding off the whisk. Be careful not to over-mix or they will get grainy and break down.
- Add your ingredients in bowls 2 and 3 to bowl 1 slowly, alternating in about 3 rounds of dry and wet ingredients to your main bowl. Mix well on low-medium speed with an electric hand mixer or whisk.
- Finally, gently fold in the egg whites to your large bowl that now holds all your other ingredients mixed together. You want your egg whites evenly distributed and mixed into the batter, but be careful not to over-mix or mix your eggs whites in aggressively.
- Bake 28-30 minutes at 350 degrees F.
- Let cool for 10 minutes, then gently remove each cake from its pan and carefully place on a cooling rack to finish cooling.
Make the Raspberry Sauce (while cake bakes – or can make ahead)
- Combine 12 oz. of fresh or thawed raspberries (drain liquid after you can thawed) in a medium-sized pot on the stove + 1/2 tsp of lemon juice and 1 Tbsp of water. Using a potato masher, smash the raspberries as you bring the mixture to a boil.
- As soon as it comes to a boil, turn the heat down to medium and whisk constantly for about a minute until the mixture thickens a bit.
- Place a fine mesh wire strainer over a bowl and pour about half of your mixture into the strainer. Use the back of a spoon to press the raspberries so that the seedless pulp falls into a bowl below. Then do again with the second half. NOTE: If you prefer to use the seeds, you can, but this is light fluffy cake and works better with a seedless sauce.
- Pour the strained sauce back into your pan on the stove. Mix 1 Tbsp water and 1 Tsp of cornstarch in a small bowl or mug and combine with a whisk or a fork to make a "slurry." Then add it to the pan. On medium heat, whisk the slurry in and continue whisking until the raspberry sauce thickens to the point where it sticks to the back of a spoon. If it's too thick, add a bit of water. If it's still too thin, whisk constantly on medium-high heat until some of the liquid evaporates, creating a thicker sauce. Let it cool.
Finish the Cake
- When both the cake and the raspberry sauce have cooled, spread the sauce on top of the cake. It will be a thin layer that will pack a lot of taste.
- Next, add a layer of your whipped topping of choice.
- (Optional) Top with crushed pistachios and fresh raspberries – as much or as little as you prefer or have on hand.
- You can serve it immediately, but it's best after refrigerated for an hour or more.
Homemade Whipped Topping (if you want to make your own)
- While you're making the cake and sauce, place your mixing bowl in the refrigerator and beaters in the freezer. COLD is important.
- Open your already chilled can of full fat coconut milk and scoop out at least 3/4 cup of the cold, solid part, trying not to get any of the liquid. If the can has 1 cup of this, use it. If it has less (sometimes happens) you'll have to open up a second can, unfortunately.
- Place everything in your cold mixing bowl and beat on high until whipped and fluffy. Use it to top your cold pie (once it's ready to serve or eat). You can store the topping in the refrigerator if your cake isn't ready yet.