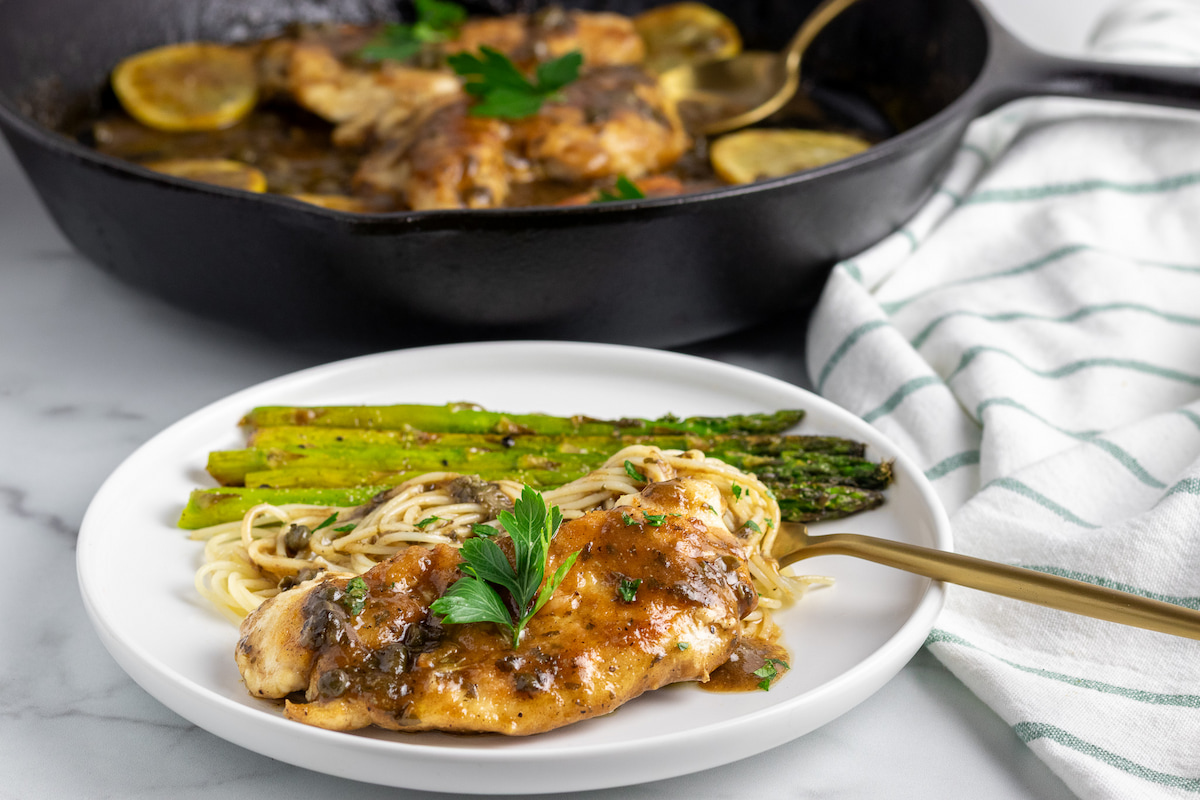
Looking for an easy, delicious Dairy-Free, Gluten-Free Chicken Piccata recipe you can make in less than 30 minutes? You are in luck! I have the perfect recipe for you.
Made in one pan, this lemony, buttery caper sauce with chicken is a restaurant-quality dinner, and no one will know it’s free of anything! BONUS: This recipe also has an AIP Diet-friendly option.
Why You Will Love This Lemon Chicken Piccata Recipe
- THE SAUCE! It’s amazing!
- Food allergen-friendly! Speaking of restaurants, if you’re allergic to dairy, gluten and/or lactose-intolerant, have celiac disease, or are eating an anti-inflammatory diet, you likely can’t even find a chicken piccata you can eat in a restaurant.
- Autoimmune diet-friendly! It’s easy to make this recipe fit the AIP diet!
- Fast! It takes about 30 minutes to make!
- Easy! Made with a handful of ingredients, this chicken piccata pasta comes together quickly.
Recipe Ingredients and Substitution Options:
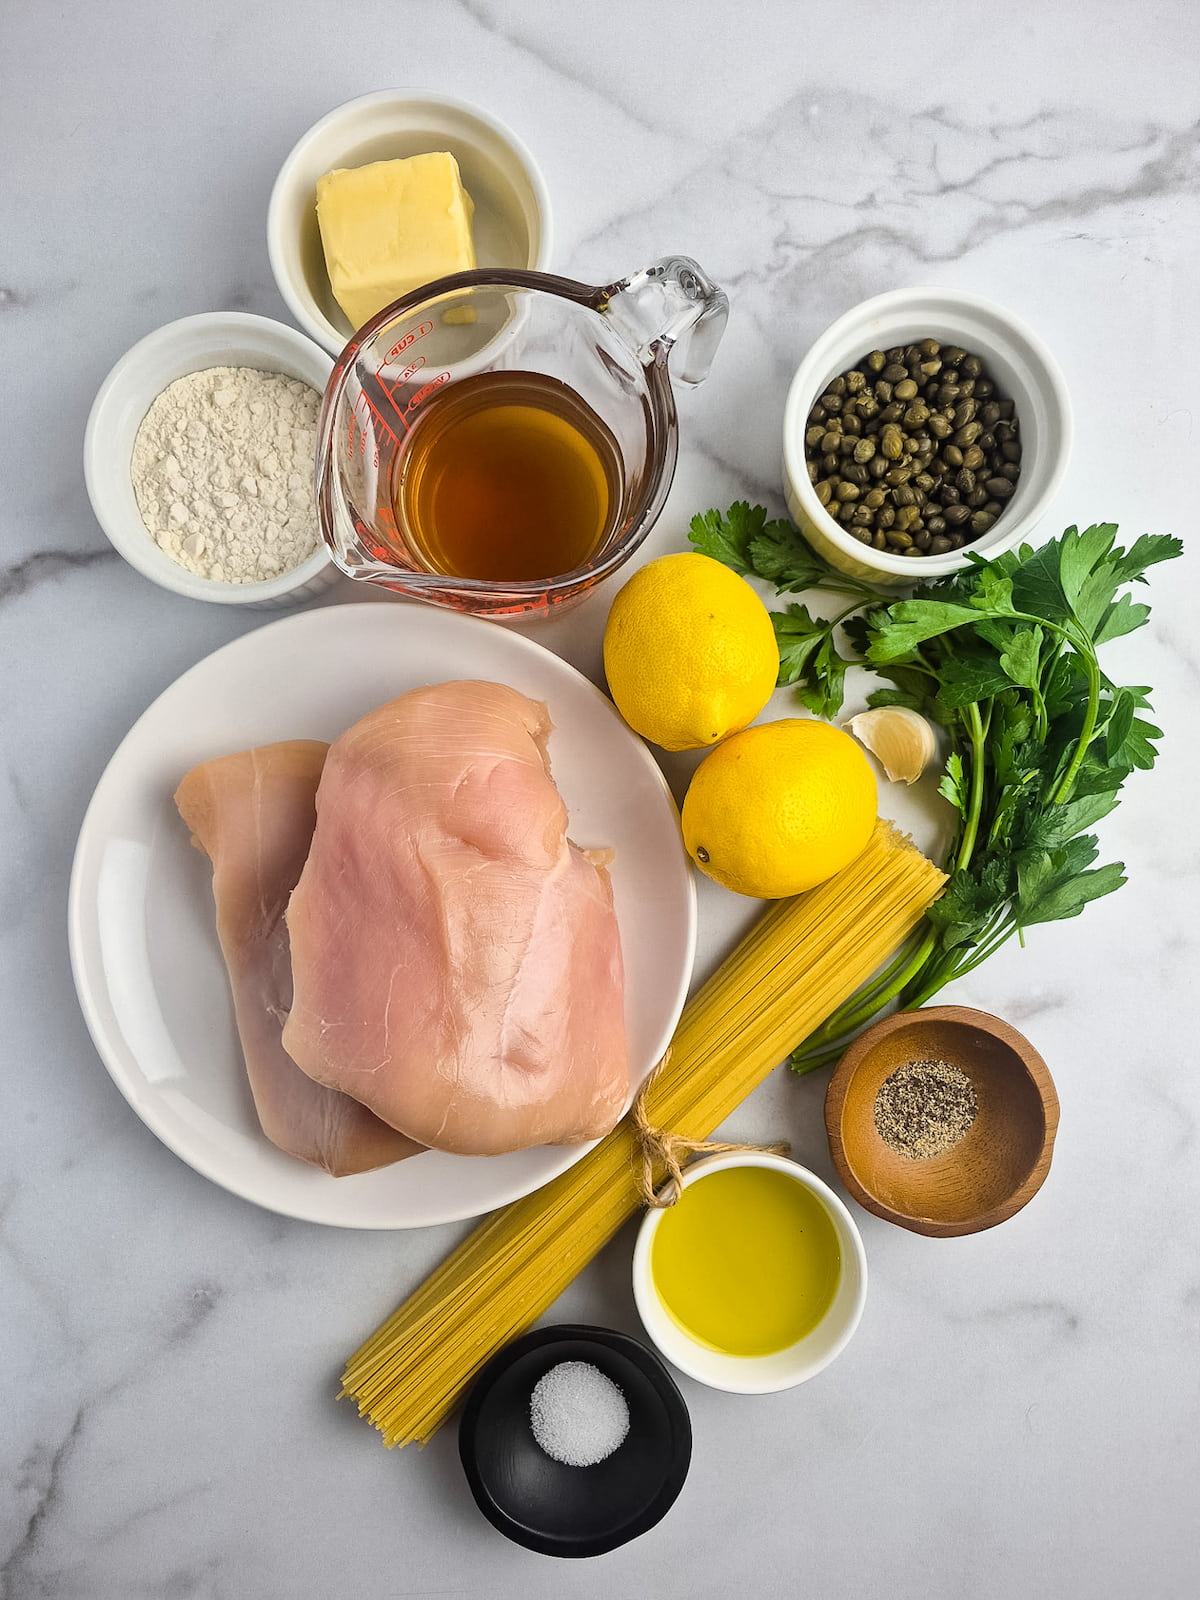
- Chicken. 1 pound of boneless skinless chicken breast meat – usually 2-3 large chicken breasts or 4-6 thin-cut breasts.
- Butter/Dairy-Free Butter. This is a velvety, buttery, lemony sauce. Use a high-quality butter substitute (I love Earth Balance buttery sticks). You can use real butter if you don’t have a dairy allergy or intolerance. I do not recommend substituting with oil.
- Olive Oil. You’ll need olive oil to cook the chicken. You can use avocado oil instead.
- Vegetable Broth. This recipe calls for vegetable broth, but you can use chicken broth instead.
- Flour. Use gluten-free flour. If you don’t need to eat gluten-free, you can use regular all-purpose flour. . You’ll need 2 Tbsp to dust the chicken and 1 Tbsp to mix with the broth to thicken the sauce.
- Note: If eating an AIP diet, use cassava or coconut flour to coat the chicken and arrowroot starch/flour or tapioca flour to thicken the sauce.
- Lemons. You’ll need two lemons. One will be used for lemon zest and fresh lemon juice, and the second will be used for lemon slice garnishes. Fresh lemon juice and zest are ideal, but you can substitute bottled/jarred if needed.
- Capers. Jarred non-pareil capers. They are a key ingredient in any piccata dish and add a lot of flavor.
- Garlic. 1 clove, minced. You can use 1-2 tsp of jarred garlic instead if you like.
- Herbs and Spices. Parsley (fresh or dried), salt and pepper (omit pepper if on AIP diet).
Equipment You’ll Need
- Large skillet
- Spatula
- Whisk
- Pot (to boil the pasta)
- Colander
Instructions: How to Make Gluten-Free Chicken Piccata
See the printable recipe card at the end of this post for more detailed instructions.
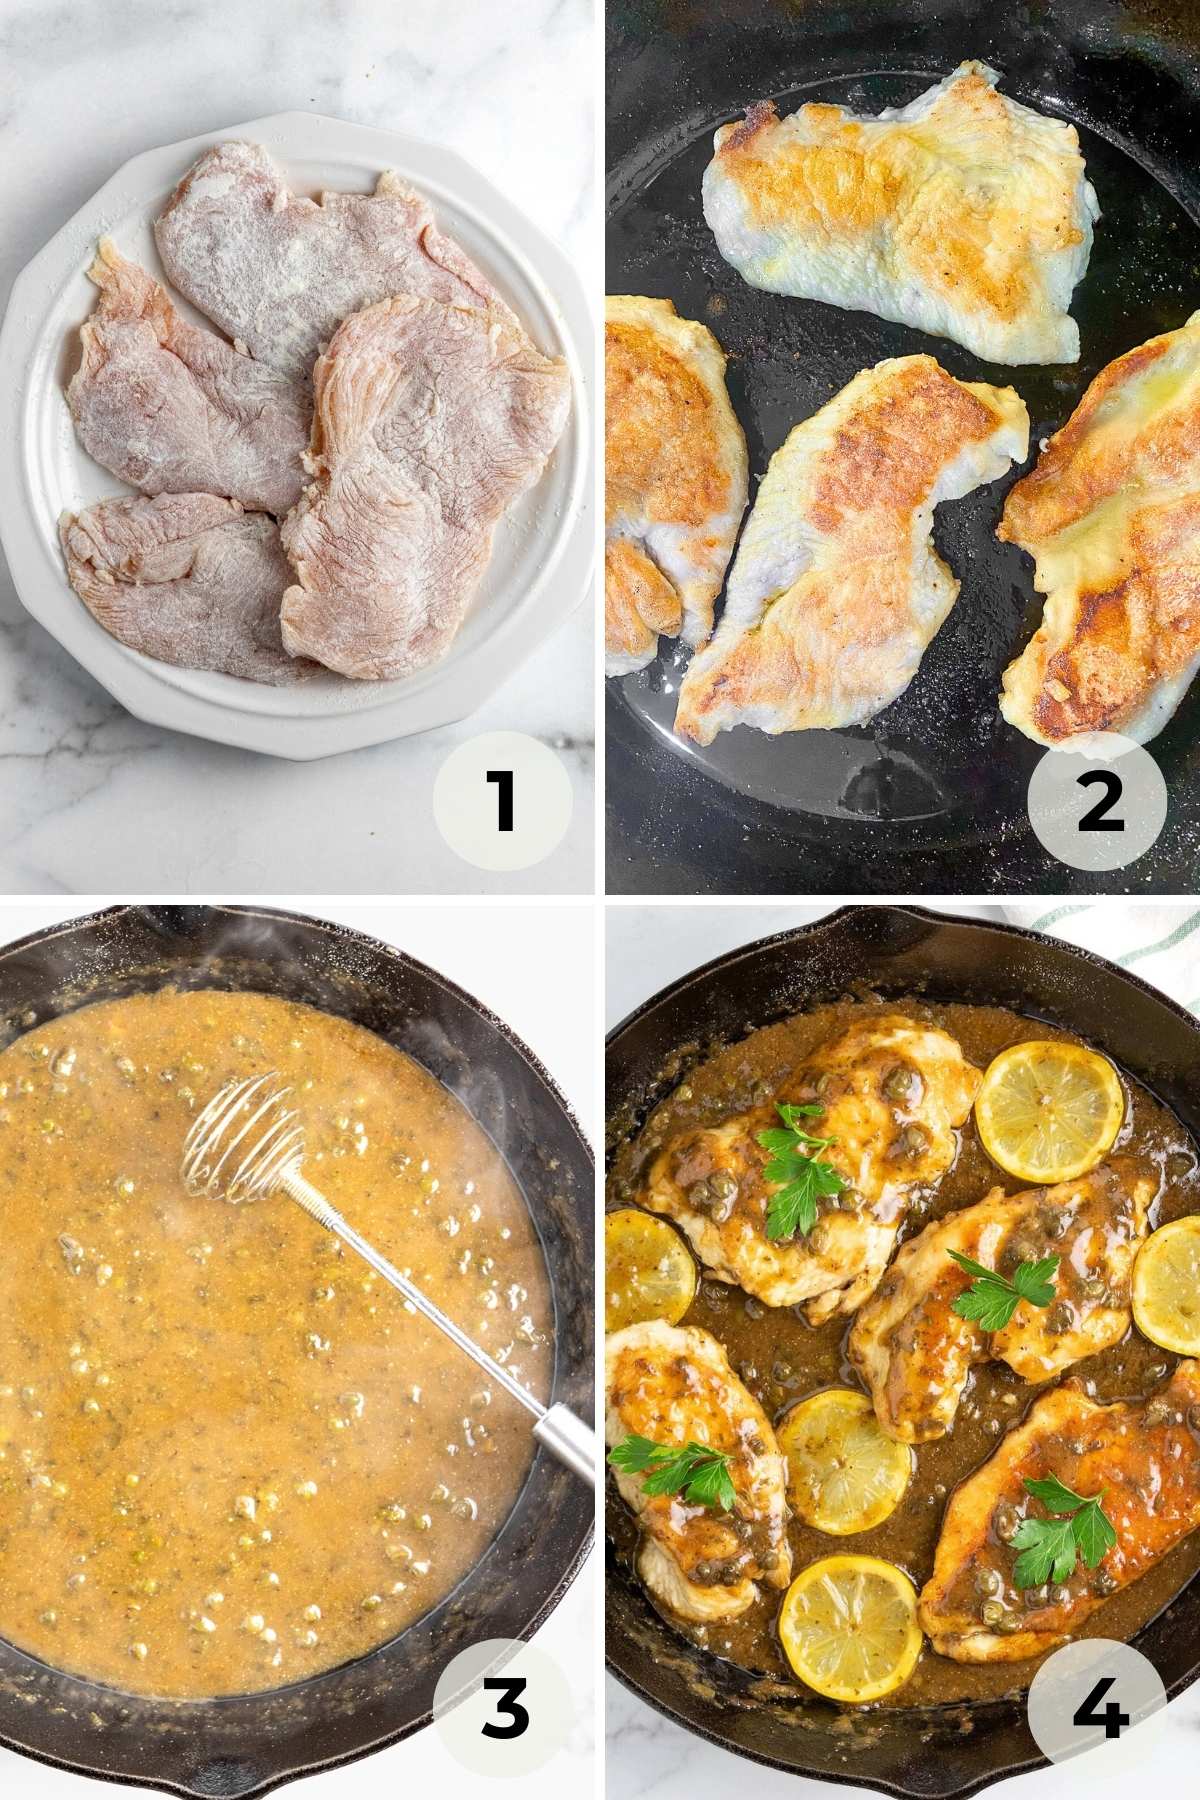
STEP 1: PREPARE THE CHICKEN
Put flour (use a gluten-free flour to make it g-f) and a little salt and pepper in a shallow bowl. Dip one side of the salmon (the non-skin side if using skin-on salmon), one piece at a time, in the flour to “dust” it.
STEP 2: COOK THE CHICKEN.
Get olive oil hot in a large skillet, then cook the salmon on both sides. I typically recommend cooking the skin side down first. HOWEVER, for this recipe, we’re just dusting the non-skin side with a little flour, and we’re cooking that side first to get it a little crispy. When done, remove from the skillet and place on a plate and cover it.
STEP 3:
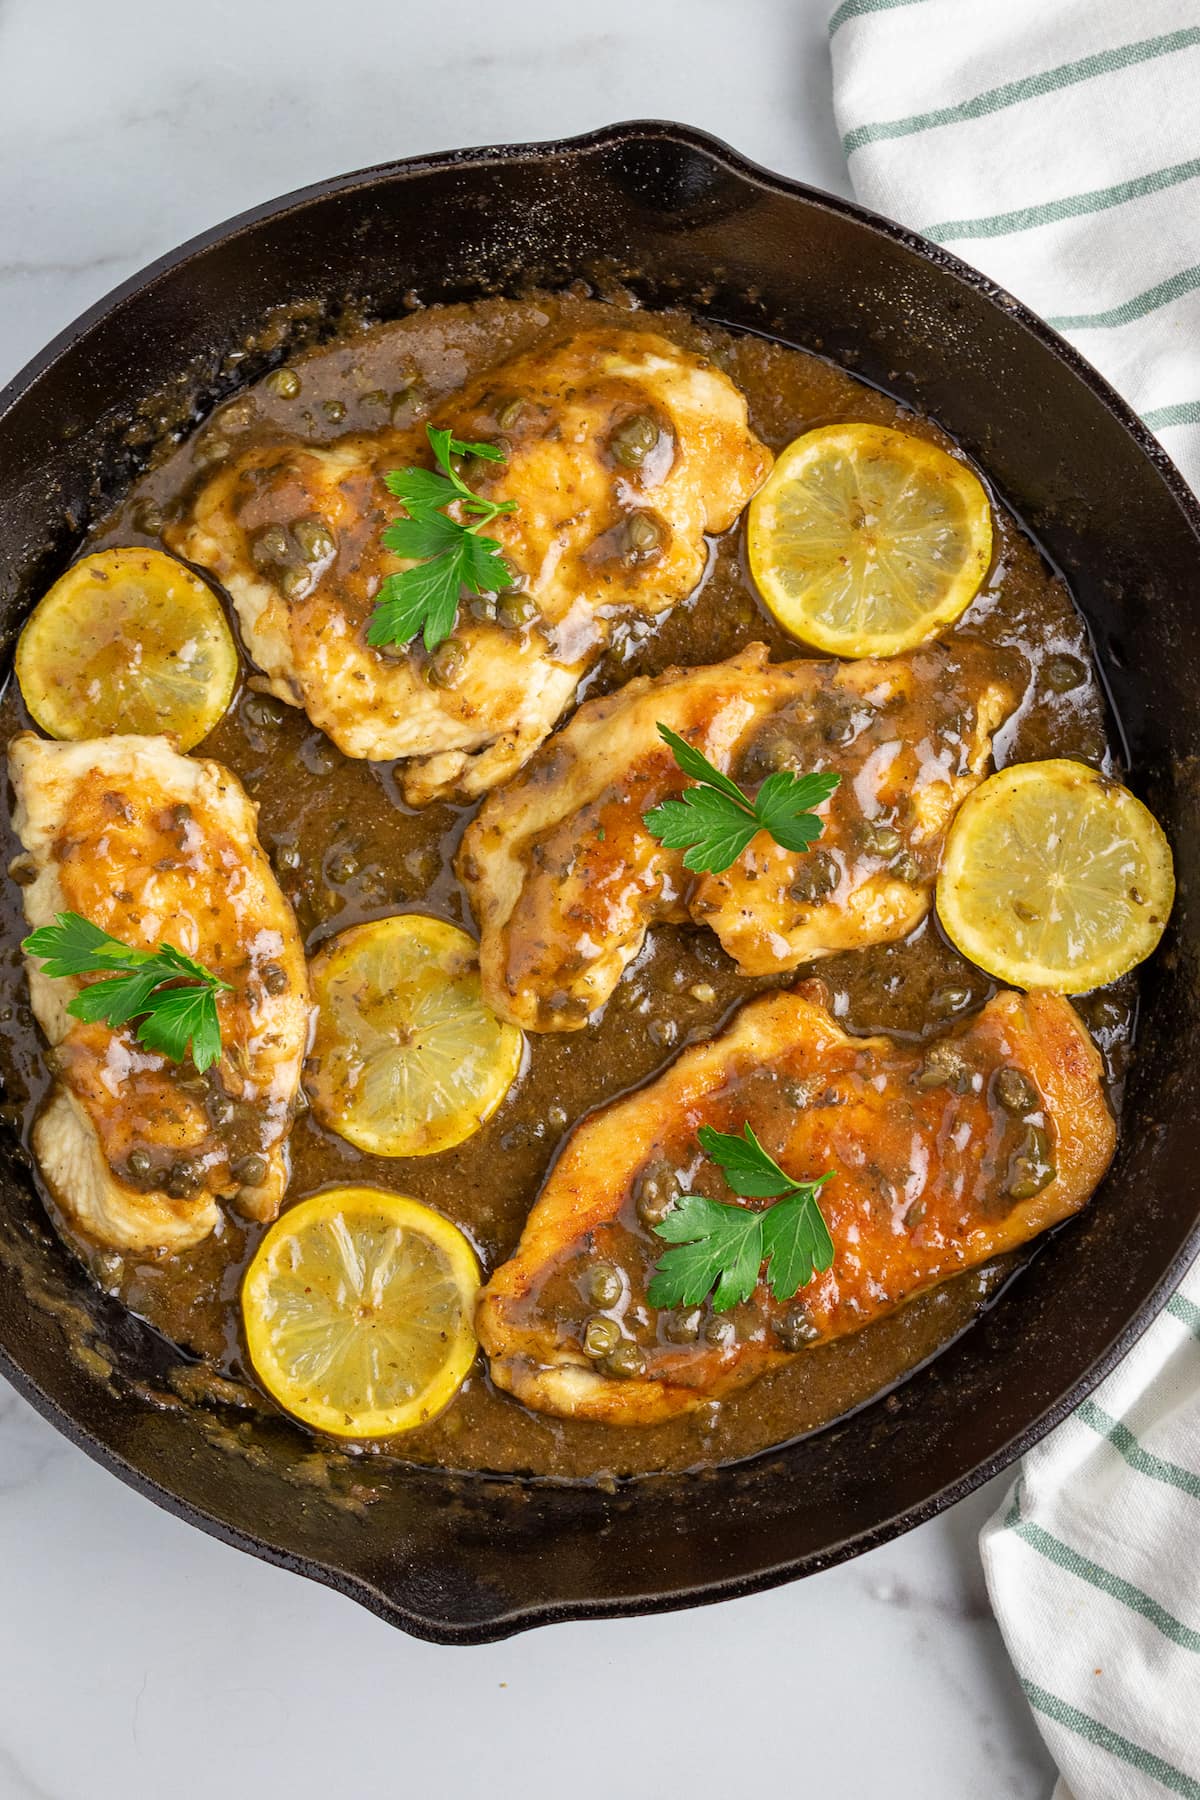
MAKE THE PICCATA SAUCE. Deglaze the pan with half of your lemon juice and scrape any salmon bits left, then add 1 Tbsp of butter/dairy-free butter and saute the minced garlic for a 1-2 minutes (until frangrant). Then add the remaining butter, remaining lemon juice, vegetable broth/flour slurry, lemon zest, capers, chopped parsely, salt and pepper. Whisk slowly over medium heat until the sauce is thickened and well-blended.
STEP 4:
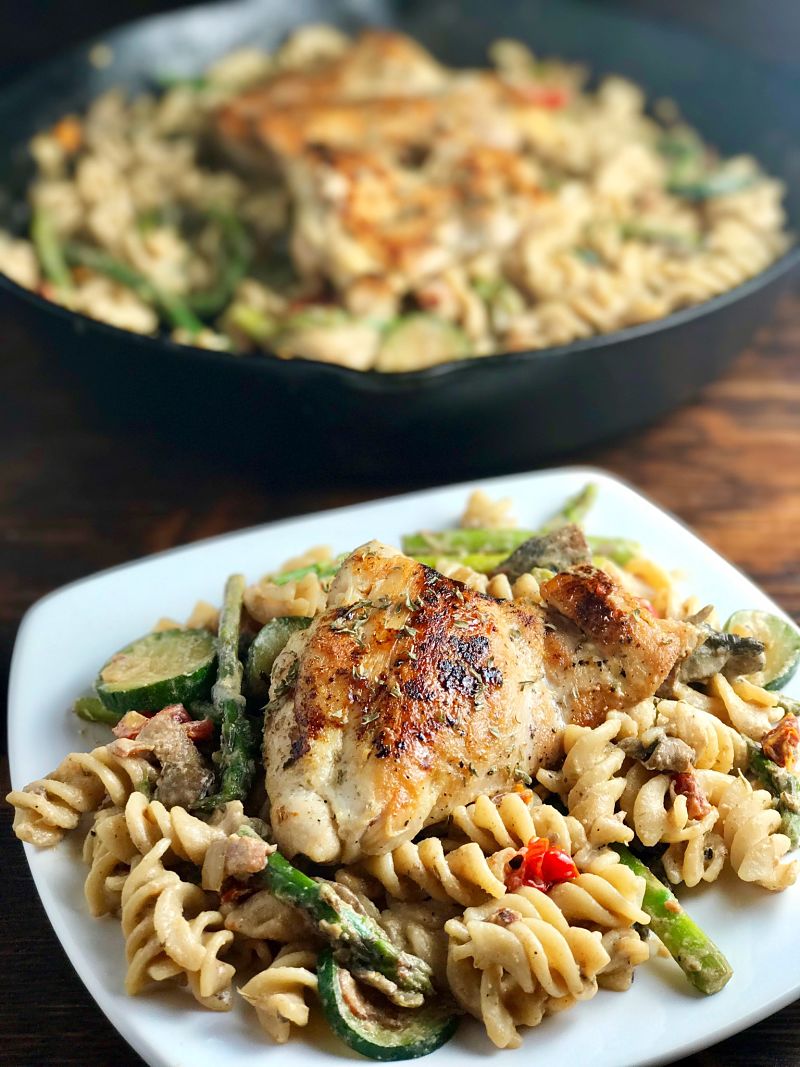
FINISH THE DISH. Add the cooked chicken back to the skillet, cook for 1-3 minutes to warm. Scoop sauce on top of chicken and add sliced lemons.
Frequently Asked Questions
Can I use salmon instead of chicken?
Yes! Follow my salmon piccata pasta recipe for best results!
I want more sauce. Can I double the sauce recipe?
Of course you can! 🙂 Please note that the nutrition information provided in the recipe card is based on the recipe as written.
Is this chicken piccata recipe AIP diet (autoimmune protocol diet)-friendly?
It’s easy to make this dish autoimmune diet-friendly. If eating an AIP diet, use cassava or coconut flour to coat the chicken and arrowroot starch/flour or tapioca flour to thicken the sauce. These flours are grain-free, nut-free, and gluten-free, making them compatible with the AIP diet’s restrictions.
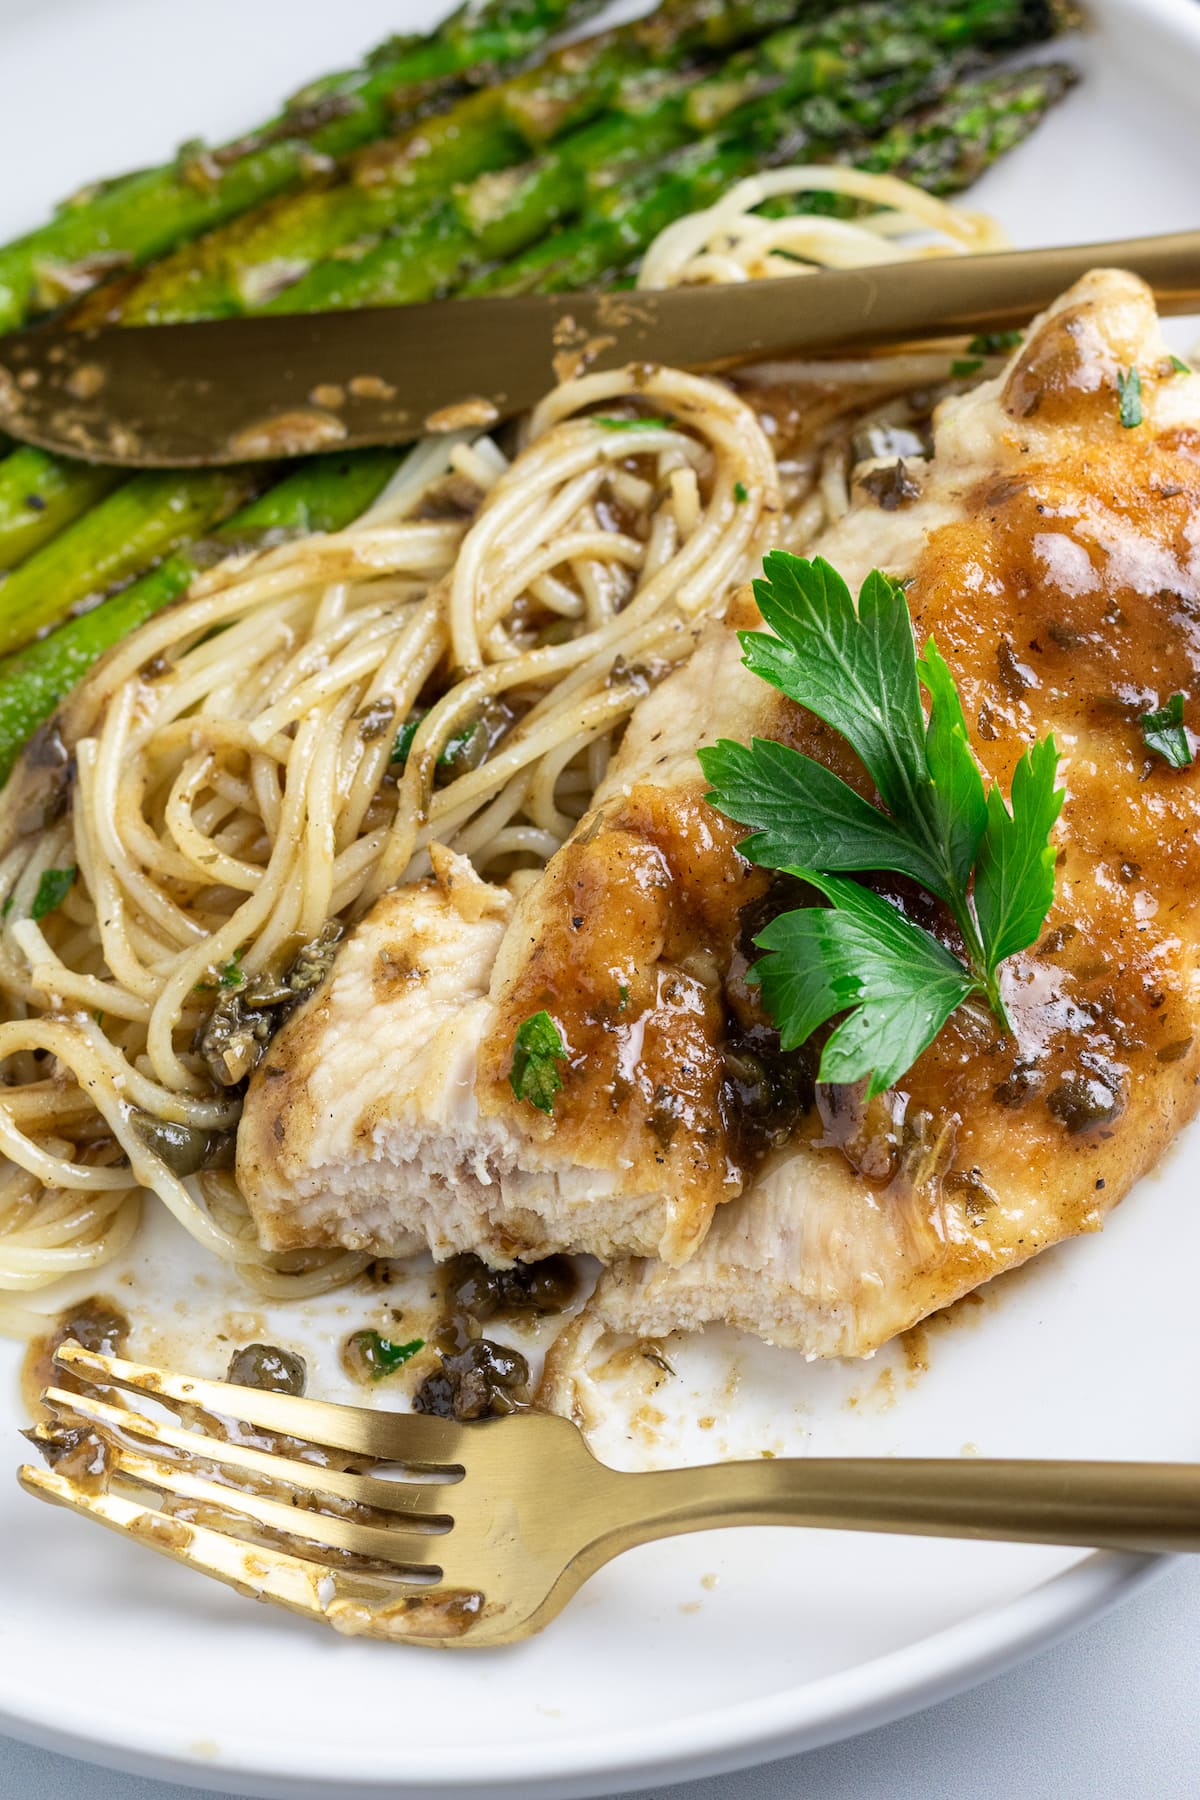
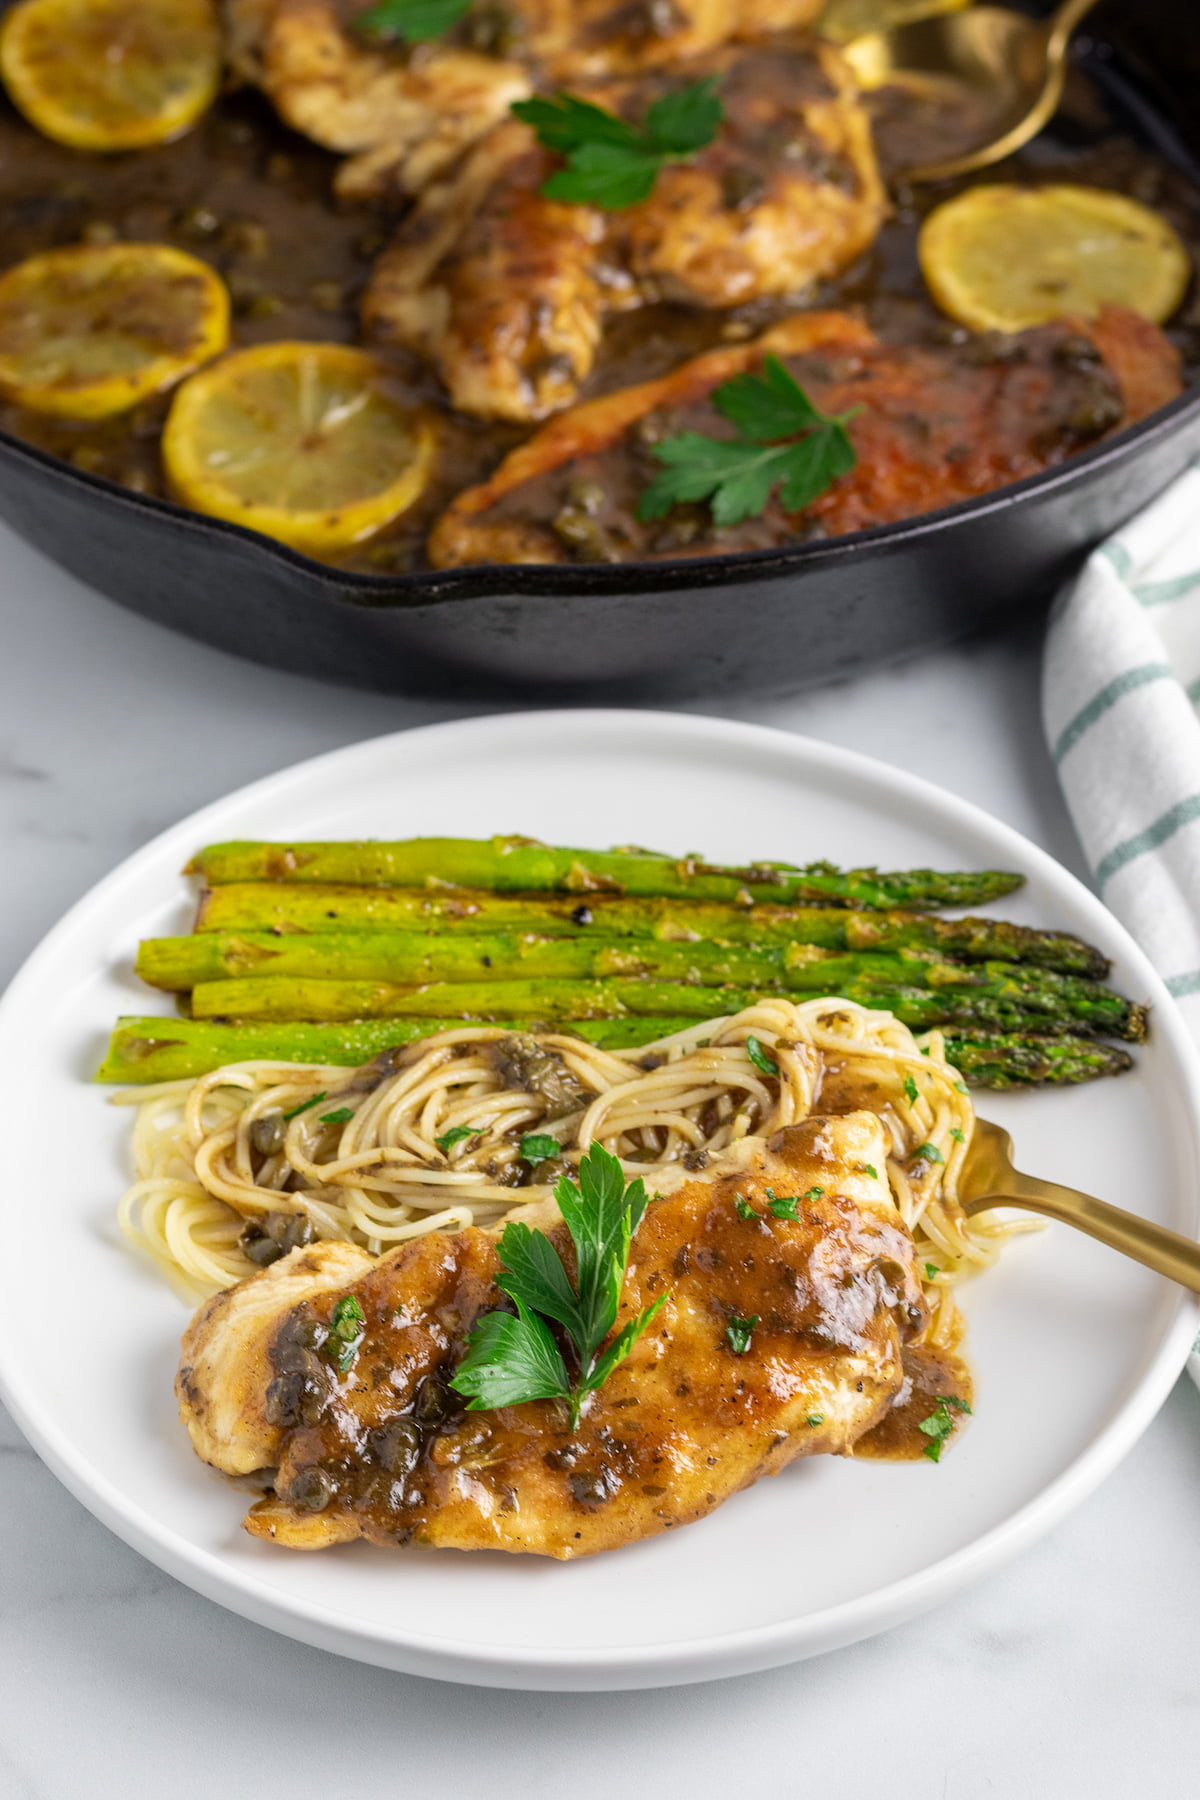
What can I serve with this gluten free chicken piccata recipe other than pasta?
Instead of pasta, you can serve it with asparagus, broccoli or over dairy-free mashed potatoes (yum!).
Shouldn’t there be white wine in this recipe?
Because some white wine can contain trace amounts of dairy and/or gluten due to the fining process to clarify wine, I opted to make it without any wine. If you’d like to use wine, you can use 1/4 cup of white wine and 3/4 cup of vegetable broth (instead of 1 cup of the broth).
What can I serve with chicken piccata?
I love to serve it with steamed broccoli, sautéed asparagus or a simple salad.
Looking for More Dairy-Free Gluten-Free Dinner Recipes?
- King Ranch Dairy Free Chicken Casserole
- Bacon-Wrapped Veggie-Stuffed Chicken
- Chicken Curry Pasta
- Salmon Piccata Pasta
- Shepherd’s Pie
- One Pan Pistachio Salmon
- Almond Butter Coconut Curry Chicken

Dairy-Free Gluten-Free Chicken Piccata
Equipment
- 1 large skillet
- 1 Citrus Juicer
- 1 Whisk
Ingredients
- 1 1b boneless skinless chicken breasts (4 thin chicken breasts or 2 full size breasts you will cut in half)
- 4 Tbsp dairy-free butter (if dairy isn't an issue, you can use real butter)
- 3 Tbsp olive oil
- 1 cup vegetable broth (or gluten-free, dairy-free chicken broth)
- 4 Tbsp gluten-free flour (I used Bob's Red Mill 1:1; you can use regular flour if you don't need to make this g-f)
- 2 lemons, for 3 Tbsp lemon juice and 1 tsp zest (you'll need 1 for fresh lemon zest + lemon juice; second lemon for garnish slices)
- 3 Tbsp capers (jarred, drained)
- 1 clove garlic
- 1 1/2 Tbsp chopped parsely (1 Tbsp for sauce; 1/2 Tbsp for garnishing; use fresh or dried)
- 1/4 tsp salt (for the sauce)
- 1/4 tsp black pepper (for the sauce)
- 1-2 Tbsp of water (if needed at the end to thin the sauce a bit)
- salt and pepper (a pinch of each to flour coating + salt and pepper to taste when finished making the sauce)
- parsley and sliced lemons to garnish (optional)
Instructions
PAN-COOK THE CHICKEN
- If you aren't using chicken breasts already cut thin, then cut each chicken breast in half, starting at the thickest part and carefully cutting each breast in half with a large, sharp knife
- Put 3 Tbsp of gluten-free flour (or regular or an AIP-friendly substitute) in a shallow bowl with a pinch of salt and pepper. One at a time, put each chicken piece in the bowl and lightly coat ("dust") both sides. You do not need to dip the chicken in egg or anything first. You want a light dusting, not a heavy coating.
- Get 3 Tbsp olive oil hot in a large skillet over medium-high heat.
- Once the oil shimmers, add the chicken to the pan. Sear the chicken for 4-5 minutes without moving it, to get the first side a bit crispy and browned. Carefully flip and cook on the other side another 4-5 minutes. Pan-cooked chicken is done when it's 165 degrees F. Set the cooked chicken on a plate to rest and cover to keep warm.
MAKE THE SAUCE
- Deglaze the pan with 2 Tbsp of fresh lemon juice and scrape any chicken bits left off the bottom (they add nice flavor to your sauce!).
- Add 1 Tbsp of butter/dairy-free butter and saute the minced garlic on medium-high heat for 1-2 minutes (until frangrant).
- Turn down to medium heat. Add the remaining "butter" (3 Tbsp), remaining lemon juice, (1Tbsp), capers (3 Tbsp), lemon zest (1 tsp), chopped parsely (1 Tbsp) and salt and black pepper (1/4 tsp each). Stir and let the butter melt.
- Put 1 Tbsp of flour or gluten-free flour in a measuring cup or mug with your 3/4 cup of vegetable broth and whisk to combine, creating a "broth slurry."
- Add the broth slurry to the sauce in your skillet, and slowly whisk it in to combine well.
- Turn the heat down to low and simmer for 2-3 minutes to allow your piccata sauce to thicken, stirring frequently. Optional – you can add 1-2 Tbsp of water at this point if the sauce seems too thick. It should be like a thin gravy.
FINISH and PLATE
- Add the cooked chicken back to the skillet, add a little of the sauce on top of each chicken breast and simmer 1-3 more minutes.
- Plate and serve with vegetables and/or pasta of your choice. Enjoy!